 |  | |
| (S)-carvone carraway | (R)-carvone spearmint |
World Wide Web version prepared by G. P. Moss
School of Physical and Chemical Sciences, Queen Mary University of London,
Mile End Road, London, E1 4NS, UK
g.p.moss@qmul.ac.uk
The recommendations in this version are identical to those in the published document prepared by Jonathan Brecher in Pure Appl. Chem. 2006, 78(10), 1897-1970. [Copyright IUPAC]. Any comments, corrections or suggestions for a future edition should be e-mailed to g.p.moss@qmul.ac.uk.
Developed by the Task Group for Graphical Representation Standards for Chemical Structure Diagrams: Chairman: W. Town (UK); Members: J. Brecher (USA), K. N. Degtyarenko (UK), H. Gottlieb (USA), R. M. Hartshorn (New Zealand), G. P. Moss (UK), P. Murray-Rust (UK), J. Nyitrai (Hungary), W. Powell (USA), A. Smith (USA), S. Stein (USA), K. Taylor (USA), A. Williams (USA), A. Yerin (Russia); Corresponding Members: S. Conway (UK), H. Cooke (USA), P. Giles (USA), M. Griffiths (USA), B. Košata (Czech Republic), B. Ramsay (USA).
Abstract: Stereochemical configuration is determined by the relationship of atoms in three-dimensional space, yet remains most commonly represented in two-dimensional media such as printed publications or computer screens. Recommendations are provided for the display of three-dimensional stereochemical information in two-dimensional diagrams in ways that avoid ambiguity and are likely to be understood correctly by all viewers. Examples are provided for all types of stereochemical configuration, with explanation of which styles are preferred and which should be avoided.
Know your audience:
• Diagrams that have a wide audience should be drawn as simply as possible.
• Avoid ambiguous drawing styles.
• Avoid the use of perspective diagrams and class-specific drawing styles (Fischer projections, Haworth projections, etc.) when structures are to be interpreted by computers.
• Use solid wedges to indicate bonds that project above the plane of the paper and hashed wedges to indicate bonds that project below the plane of the paper; in both cases, the bonds must be oriented with the narrow end at the stereogenic center.
• Avoid connecting stereogenic centers with a stereobond.
CONTENTS
ST-0. INTRODUCTION
ST-0.1 OverviewST-1. TETRAHEDRAL CONFIGURATIONS
ST-0.2 Plain bonds
ST-0.3 Hashes, dashes, and wedges
ST-0.4 Wavy bonds
ST-0.5 Stereobonds between stereocenters
ST-0.6 Asterisks
ST-0.7 CIP stereodescriptors
ST-0.8 Mixtures of diastereoisomers
ST-1.1 Tetrahedral configurations depicted with four explicit bondsST-2. CONFIGURATIONS AT NON-TETRAHEDRAL ATOMS
ST-1.2 Tetrahedral configurations depicted with three explicit bonds
ST-1.3 Stereogenic centers in rings
ST-1.4 Tetrahedral centers at re-entrant atoms
ST-1.5 Tetrahedral stereocenters including higher-order bonds
ST-1.6 Systems with an even number of consecutive double bonds
ST-1.7 Hindered biaryls
ST-1.8 Fischer projections
ST-1.9 Haworth projections
ST-1.10 Mills depictions
ST-1.11 H-Dot/H-Dash/H-Circle
ST-2.1 LinearST-3. USE
ST-2.2 Angular
ST-2.3 T-shaped
ST-2.4 Trigonal planar
ST-2.5 Trigonal pyramidal
ST-2.6 Square planar
ST-2.7 Square pyramidal
ST-2.8 See-saw
ST-2.9 Trigonal bipyramidal
ST-2.10 Square pyramidal
ST-2.11 Octahedral
ST-2.12 Trigonal prismatic
ST-2.13 Higher coordination numbers
ST-3.1 Restrictions on perspective drawingsST-4. DOUBLE-BOND CONFIGURATIONS
ST-3.2 Configuration in perspective drawings
ST-3.3 Use of bold bonds to emphasize perspective
ST-4.1 Positioning of substituents on double bondsST-5. OTHER CONFIGURATIONS
ST-4.2 Other systems with an odd number of consecutive double bonds
ST-4.3 Double bonds in rings
ST-4.4 Double bonds of unspecified configuration
ST-4.5 Double bonds with implicit bonds to substituents
ST-5.1 Planar chiralityST-6. ENANTIOMERS: MIXTURES AND UNKNOWN ABSOLUTE CONFIGURATIONS
ST-5.2 Helicenes
ST-5.3 Möbius bands
ST-5.4 Molecular propellers
ST-6.1 Representation goalsST-0. INTRODUCTION
ST-6.2 Absence of indicators indicates configuration as drawn
ST-6.3 Mixtures should be represented with additional explanatory text
ST-6.4 Racemic mixtures and other mixtures in known proportions
ST-6.5 Avoid use of “racemate” and “relative” as structural labels
Stereochemistry is the aspect of chemistry concerned with the spatial arrangement of atoms in molecular entities and the effect that differences in the spatial arrangement of atoms have on physical properties and chemical reactivity. The significance of stereochemistry even in everyday life is famously demonstrated by the two enantiomers of carvone, where the (S)-form provides the odor of caraway while the (R)-form instead smells like spearmint.
| | |
| (S)-carvone carraway | (R)-carvone spearmint |
Molecular entities are inherently three-dimensional, but they are commonly depicted on two-dimensional media such as paper or computer displays. Any depiction of a three-dimensional object on a two-dimensional surface is going to require some level of distortion, and the problems associated with the communication of three-dimensional information in two-dimensional media are far from unique to chemistry. The introduction of perspective, for example, was one of the hallmarks of early Renaissance artwork. Although the use of perspective is commonplace today in pictorial images, it is less commonly used in conjunction with symbolic information: mapmakers use contour lines to indicate elevation or varying shades of blue to indicate ocean depth.
In chemistry, the need to imply the true three-dimensional molecular architecture in two-dimensional media has given rise to a variety of structure drawing conventions. One convention depends on perspective to convey spatial relationships, just as a pictorial image would. The use of perspective in structure drawing is discussed in its own section. By far the most common way to represent spatial configuration is through the insertion of special bond types—bold, hashed, dashed, and/or wedged—into an otherwise planar depiction. Each special bond type would indicate the spatial arrangement of two atoms in relation to each other, usually specifying that one or the other atom was closer to or further from the viewer relative to the plane of the diagram. The proper use of hashed wedged and solid wedged bonds occupies the majority of these recommendations.
Issues of configuration are “restricted to the arrangements of atoms of a molecular entity in space that distinguishes stereoisomers, the isomerism between which is not due to conformation differences” [1]. That is, this document is concerned with arrangements of atoms that cannot be interconverted through the unhindered rotation about single bonds. Historically, the varying conventions for depiction of configuration have caused confusion among chemists. Any one diagram may or may not have had a single interpretation either by the chemist who viewed the information or, as is now becoming more important, by the computer program into which the information was stored. This publication provides a self-consistent series of recommendations for the unambiguous depiction of molecules in two dimensions using standards that are, for the most part, understandable by both human and machine.
ST-0.1 Overview
Throughout this publication are numerous examples of chemical structure diagrams drawn in styles that are labeled as “preferred”, “acceptable”, “not acceptable”, or occasionally “wrong”. Since the depiction of chemical structure diagrams is something of an art form and will likely remain so, it is worthwhile to clarify the meaning of those terms as they are used here.
A chemical structure diagram is most commonly used simply as a means of identification, a way to answer the implied question, “What is the chemical structure of X?” The styles labeled as “preferred” show how the configuration of a structure should best be indicated in such cases, where there are no other overriding concerns. These depiction styles are generally applicable across many classes of compounds.
Sometimes, however, overriding concerns are present. Steroids, for example, should normally be drawn in a specific fixed orientation [2]. A complex structure might need to be distorted in order to avoid overlap in other parts of the diagram. Bridged ring systems can be particularly interesting, since the topology of the ring system itself can force its bonds into orientations that are not seen in acyclic systems. Solid wedged bonds (![]() ) and hashed wedged bonds (
) and hashed wedged bonds (![]() ) should not be placed between two stereogenic centers except when literally unavoidable; that restriction alone accounts for many of the exceptional cases in this publication. The diagrams labeled as “acceptable” indicate additional depiction styles that could be considered if the usually preferred style is problematic in a particular case.
) should not be placed between two stereogenic centers except when literally unavoidable; that restriction alone accounts for many of the exceptional cases in this publication. The diagrams labeled as “acceptable” indicate additional depiction styles that could be considered if the usually preferred style is problematic in a particular case.
Many of the structural depictions included in this document are provided as counterexamples, to increase awareness of how structures should not be shown. Those depictions are labeled as “not acceptable”, indicating that they should be strongly avoided in normal usage. Where possible, they have been accompanied by further description of why they are not acceptable, and why the alternative depictions are preferred or more acceptable. Depictions labeled as “not acceptable” are not acceptable under any circumstances. They are not simply undesirable alternatives to be avoided when depicting the specific compounds better shown in nearby diagrams labeled as “preferred” or “acceptable”, but are “not acceptable” for representing any molecular entities.
Finally, a small number of examples are labeled as simply “wrong”. Those show representations that should be avoided in all cases, generally because they depict something that is either self-contradictory or because they accurately represent a molecular entity other than the one intended.
Some structural depictions are described as being formally correct, formally incorrect, or formally ambiguous, referring to whether a depiction might possibly represent the intended configuration from a strictly logical or formal analysis. For example, it is formally incorrect to depict a tetrahedral configuration using four solid wedged bonds connected to a central atom. Such a depiction would imply that all four substituents are on the same side of the central atom (all “nearer” the viewer relative to the plane of the diagram), whereas the geometrical definition of a tetrahedron precludes such an arrangement. The formal correctness of a structural depiction is related to the acceptability of the depiction, but the two are not exactly the same. Some depictions may be formally incorrect but still preferred because of long-standing convention. Other depictions may be formally correct but not acceptable. Discussions of formal correctness are included principally in cases where correctness and acceptability differ
. Several of the depiction styles include descriptions with specific angular measurements. For the sake of readability, angular measurements are listed with exact numerical values, such as 180°. Unless otherwise specified, all such measurements should be considered to be approximate, and as specifying a range within roughly 10° of the listed value. The same applies to textual descriptions of angles, so the term “linear” should be interpreted as “forming an angle between 170° and 190°”. In other words, two bonds that look nearly collinear should be treated as exactly collinear, even if that is not exactly true of their actual geometric relationship.
Similarly, any mention of bonds being “adjacent” refers to their appearance in the two-dimensional representation. Any bond in a physical (three-dimensional) tetrahedron is physically adjacent to every other bond, but in a two-dimensional representation it is depicted as adjacent to only two others, and “opposite” to the third. Any pair of bonds described as “separated by” an angle refers only to adjacent bonds, without a third bond drawn within the span of that angle in the two-dimensional depiction.
Discussions of “the plane of the paper” are intended to encompass any surface on which the two-dimensional chemical structure diagram is presented, whether paper (as in a journal), plastic (as on a transparency), electronic (as on a computer screen), or any other medium. A more general description such as “the plane of the diagram” cannot be used because not all chemical structure diagrams do define a unique plane. The directions “above”, “below”, “left”, and “right” refer to the four cardinal directions, while “vertical” and “horizontal” refer to the two cardinal axes within that plane, all relative to the viewer’s orientation. The terms “up” and “down” refer to the axis perpendicular to that plane, with “up” closer to the viewer and “down” further away. Such terms are used consistently within these recommendations, with the understanding that “up” relative to that plane might not coincide, for any given diagram, with “further from the center of the Earth.”
This publication extends and supersedes the section titled “Graphic Representation of Three-Dimensional Structures” in the earlier publication on the Basic Terminology of Stereochemistry [1]. Only issues related to the depiction of configuration are discussed here; a future publication is planned that will make recommendations regarding non-stereochemical aspects of chemical structure depiction.
ST-0.2 Plain bonds
All single bonds attached to nonstereogenic atoms should normally be drawn as plain bonds, that is, as simple thin lines that are not bold or dashed or hashed or wavy or adorned in any other way. The use of stereobonds (![]() ,
, ![]() ,
, ![]() ,
, ![]() , – – – –, etc.) at nonstereogenic atoms should generally be avoided.
, – – – –, etc.) at nonstereogenic atoms should generally be avoided.
 |  |  | ||
| Preferred | Not acceptable | Not acceptable |
It is always acceptable to use stereobonds when emphasizing three-dimensional configuration, whether the associated atoms are stereogenic or not. For example, solid wedged bonds and hashed wedged bonds might be used when designating the pro-R and pro-S substituents on a prochiral tetrahedral center, or when depicting syn, gauche, or anti conformations. This does not contradict the previous paragraph, as prochiral centers and torsion angles are in fact not normally emphasized as such. The use of solid wedged bonds and hashed wedged bonds in nonstereogenic environments is outside the scope of these recommendations.
Plain bonds should be used for nonstereogenic atoms even though the atom’s substituents are not physically coplanar.
 |  | |
| Preferred | Not acceptable |
If it is necessary to depict the configuration of a nonstereogenic center (for example, when discussing prochiral atoms or their heterotopic substituents), the bonds should be arranged analogously with the recommendations given in this document for stereogenic centers.
 |  |  | ||
| Preferred (general usage) | Preferred (when discussing prochirality of the tetrahedral carbon) | Not acceptable | ||
 |  |  | ||
| Preferred (general usage) | Preferred (when discussing heterotopy of the two hydrogen atoms) | Not acceptable |
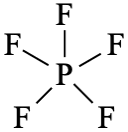 | PF5 |  | 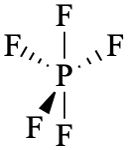 | |||
| Preferred (general usage) | Preferred (general usage) | Preferred (when implying trigonal bipyramidal configuration usage) | Not acceptable |
When attached to stereogenic atoms, plain bonds indicate the set of bonds that is to be considered as being in the plane of the paper or screen. Other solid wedged or hashed wedged bonds are considered to extend above or below this plane. As a general rule, structure diagrams should be drawn to maximize the number of plain bonds, although there are exceptions (particularly for inorganic complexes with coordination numbers greater than four).
 |  |  |  | |||
| Preferred | Acceptable | Preferred | Acceptable |
As discussed above, it is always acceptable to use solid and hashed wedged bonds when emphasizing the perspective of three-dimensional configuration, even if an alternate representation is possible that uses fewer stereobonds. Again, however, such exceptions should be considered only when necessary to accommodate some other aspect of the diagram and are not preferred in the general case.

 |  |  | ||
| Preferred | Not acceptable | Not acceptable |
ST-0.3 Hashes, dashes, and wedges
Structural diagrams that depict configuration must be prepared with extra care to ensure that there is no ambiguity. As discussed in ST-0.2, plain lines depict bonds approximately in the plane of the drawing. Bonds to atoms above the plane should be shown with a solid wedge ![]() (starting from an atom in the plane of the drawing at the narrow end of the wedge). A bold bond
(starting from an atom in the plane of the drawing at the narrow end of the wedge). A bold bond ![]() has sometimes been used instead of a bold wedge but is not recommended.
has sometimes been used instead of a bold wedge but is not recommended.
Unfortunately, bonds below the plane of the drawing have historically been represented in many different ways. Each of those representations has involved a bond drawn with small line segments either coincident with (– – – –) or perpendicular to (![]() ,
,![]() ) the main axis of the bond. The two schools of thought that prefer the use of a hashed wedge bond
) the main axis of the bond. The two schools of thought that prefer the use of a hashed wedge bond ![]() assign it two directly opposite interpretations — one school says that the atom at the narrow end should be considered in the plane of the paper, while the other says that the atom at the wide end should be so considered. Additionally, a dashed line – – – – is often used also to represent a partial bond, delocalization, or a hydrogen bond. The biggest problem is that there is no way to intuit an author’s desired meaning from a chemical structure drawing alone.
assign it two directly opposite interpretations — one school says that the atom at the narrow end should be considered in the plane of the paper, while the other says that the atom at the wide end should be so considered. Additionally, a dashed line – – – – is often used also to represent a partial bond, delocalization, or a hydrogen bond. The biggest problem is that there is no way to intuit an author’s desired meaning from a chemical structure drawing alone.
In cases where such below-the-plane bonds are required, there is no option that will please everyone. Earlier recommendations [1] proposed the use of an unwedged hashed bond ![]() , but today such bonds are in fact encountered in the literature least frequently of all options. This document now recommends the use of a hashed wedged bond
, but today such bonds are in fact encountered in the literature least frequently of all options. This document now recommends the use of a hashed wedged bond ![]() interpreted in a sense similar to the solid wedged bond (starting from an atom in the plane of the drawing at the narrow end of the wedge). This recommendation is made primarily because the hashed wedge is easier to analyze visually than the unwedged type, particularly when it is used in a sense similar to the wedged bold bond. Strictly speaking, unwedged bold and hashed lines show that both atoms are above or below the plane of the drawing (as is used in Haworth drawings of carbohydrates). If these bonds are used to convey chirality, they require extra effort to determine which atoms are truly asymmetric and which are not. The wedged hashed bond contains more — and more useful — information than the unwedged version. While the use of an unwedged hashed bond is often unambiguous, such a bond is not always unambiguous, and in the rare cases that cannot avoid having a hashed bond between stereocenters (see ST-0.5), the unwedged version will never be unambiguous. Additionally, the consistent use of a wedged bond is simpler: in each case, the sharp end of the bond shows the stereogenic center, and there is no need to analyze both ends to figure out what was intended. After careful consideration, it appears that the least disruptive recommendation is that only the hashed wedged bond be used when representing below-the-plane bonds.
interpreted in a sense similar to the solid wedged bond (starting from an atom in the plane of the drawing at the narrow end of the wedge). This recommendation is made primarily because the hashed wedge is easier to analyze visually than the unwedged type, particularly when it is used in a sense similar to the wedged bold bond. Strictly speaking, unwedged bold and hashed lines show that both atoms are above or below the plane of the drawing (as is used in Haworth drawings of carbohydrates). If these bonds are used to convey chirality, they require extra effort to determine which atoms are truly asymmetric and which are not. The wedged hashed bond contains more — and more useful — information than the unwedged version. While the use of an unwedged hashed bond is often unambiguous, such a bond is not always unambiguous, and in the rare cases that cannot avoid having a hashed bond between stereocenters (see ST-0.5), the unwedged version will never be unambiguous. Additionally, the consistent use of a wedged bond is simpler: in each case, the sharp end of the bond shows the stereogenic center, and there is no need to analyze both ends to figure out what was intended. After careful consideration, it appears that the least disruptive recommendation is that only the hashed wedged bond be used when representing below-the-plane bonds.
Admittedly, strong cases can be made in favor of other systems. A system based entirely on a perspective-based analysis is possibly the most popular of those other systems. In a perspective-based analysis, more-distant objects are always perceived as smaller than objects that are nearer. Accordingly, a wedged bond is interpreted as extending above the plane of the paper from the narrow end to the wide end, and extending behind the plane of the paper when considered from the wide end to the narrow end. Lin et al. [3] have shown that a system of this type can be internally self-consistent and can be used to represent most types of tetrahedral configurations. Unfortunately, it cannot be used in all cases. Since this system always specifies the configuration of atoms at both ends of every wedged bond, it cannot be used to depict, for example, a tetrahedral center of known configuration connected to four other centers of unknown configuration. Additionally, the One-Wedge system as described by Lin et al. eliminates the use of a hashed wedge bond entirely, thereby discarding a very popular drawing style widely used for many years. This simplification has some appeal in terms of simplicity of usage, but the benefits of a hashed bond — in particular, the ease with which a hashed bond can be distinguished from a bold bond at a quick glance — are too great to eliminate.
Others have recommended a perspective-based analysis that preserves the use of a hashed bond. The scheme described earlier, where a hashed wedged bond would be interpreted as “down” from the wide end to the narrow end, is a perspective-based approach. Unfortunately, this system not only suffers from the same weaknesses as the One-Wedge approach above, but additionally results in a scheme where a solid wedged bond and a hashed wedged bond—while looking quite different—actually represent exactly the same concept [4].
The creation of a new graphical bond depiction could certainly be considered. An entirely new depiction would avoid all problems associated with the various historical meanings of existing bond types. However, any new type would also necessarily be unfamiliar to all chemists. Considering the poor acceptance of the unwedged hashed bond since its proposal 10 years ago [1], there seems little point to recommending yet another new bond depiction style now.
The least disruptive recommendation is to reject a perspective-based approach, and rather to interpret the bonds as more-abstract graphical objects. A solid wedged bond should be interpreted as projecting above the plane of the paper from the narrow end to the wide end (with the wide end being nearer to the viewer), and a hashed wedged bond should be interpreted as projecting below the plane of the paper, also from the narrow end to the wide end (with the wide end being further away from the viewer). To summarize, the narrow end of solid wedged bond or a hashed wedged bond always should point towards the stereogenic center to which it applies.
 |  | |
| Acceptable | Acceptable |
However, anyone using bonds of these types should be aware that they are not the most common bond types used to represent behind-the-plane configuration. At best, an author using these types may cause a moment of confusion as a reader figures out which convention was intended. In extreme cases, a reader (or chemical software) might actually interpret the structure incorrectly — for example, by interpreting an unwedged hashed bond in the convention where it would represent relative (and not absolute) configuration, as discussed in ST-0.8 and ST-6. Fortunately, such cases are rare. The hashed wedged bond (interpreted from the narrow end to the wide end) remains preferred, and accordingly is the only convention used in this document.
Because the unwedged hashed bond can be used to indicate the configuration of individual stereocenters but is also visually non-directional, it absolutely must not be used when connecting two stereocenters. (See also ST-0.5.)
 |  |  | ||
| Preferred (see ST-1.7) | Preferred (see ST-1.9) | Not acceptable |
The dashed bond should be reserved for the indication of partial bonding of various types, including hydrogen bonding. It should not be used to represent configuration.
 |  | |
| Preferred | Not acceptable |
In no cases should multiple types of a hashed bond be used in the same diagram.
 |  |  | ||
| Preferred | Acceptable | Not acceptable |
ST-0.4 Wavy bonds
If configuration is unknown, this can be indicated explicitly by a wavy line ![]() . The waves in such a line may be rounded or angular, but they should be of constant amplitude. The use of “wedged wavy” bonds is discouraged.
. The waves in such a line may be rounded or angular, but they should be of constant amplitude. The use of “wedged wavy” bonds is discouraged.
In most cases, a wavy bond is conceptually identical to a plain bond, and a plain bond should be used instead. Wavy bonds are most often used in general usage when an author wants to place special emphasis on the unknown nature of the configuration at a specific position; the wavy bond would usually be accompanied by additional explanatory text in that case.
 |  | |
| Preferred | Acceptable |
In perspective diagrams (ST-3), configuration is depicted using plain bonds, so wavy bonds must be used when depicting stereogenic centers of unknown configuration in such diagrams.

In Haworth projections of carbohydrates, the anomeric carbon is frequently indicated with a wavy bond when representing a mixture of anomers [5]. This usage of a wavy bond should not be extended to compounds outside those classes.
Stereobonds between stereocenters should be avoided at all costs. This was stated in ST-0.3 but bears repeating because it is so important. Although a solid wedged bond or a hashed wedged bond should only indicate configuration for the atom at the narrow end of the bond, any stereobond connecting two stereocenters invites confusion. The reader cannot immediately know the intent of the author of such a diagram, especially in the light of historical drawing conventions that assumed different interpretations for stereogenic centers at the wide ends of solid wedged and hashed wedged bonds. For greatest clarity and least chance of misinterpretation, it is preferred simply not to position stereobonds between stereocenters when any other option is available.
 |  |  | ||
| Preferred | Not acceptable | Not acceptable | ||
 |  |  | ||
| Preferred | Not acceptable | Not acceptable |
 |  | |
| Preferred | Not acceptable |
In rare cases — for example, when one stereocenter is completely surrounded by four other stereocenters — a stereobond must be present between two stereocenters. There is no ideal solution in such cases, as some ambiguity is unavoidable. In this case, solid wedged bonds should be used exclusively (as much as possible), and as always only the atom at the narrow end of the wedge should be considered as having a specified configuration. Hashed bonds connecting two stereogenic centers are always ambiguous, as discussed in ST-0.3.
 |  | |
| Preferred | Acceptable |
If the central atom has a specific configuration and each of the surrounding atoms also has a specific configuration, additional stereobonds must be added to the surrounding atoms. It is preferred to select a depiction style for the central atom that has as few stereobonds as possible, since that will eliminate completely any ambiguity regarding the intended configuration at some of the adjacent atoms.
 |  | |
| Preferred | Acceptable |
ST-0.6 Asterisks
Asterisks have traditionally been used in several contexts: not only to indicate the presence of a stereogenic center, but also to specify isotopic labeling or excited states. Accordingly, the use of an asterisk as an indicator for any one of those items (including as an indicator of stereogenic centers) is potentially misleading and should be avoided. Any use of the asterisk should be undertaken with extreme care, and should generally be accompanied by additional descriptive text that explains its meaning in that specific context.
ST-0.7 CIP stereodescriptors
Absolute configuration can be described using descriptors derived from the Cahn-Ingold-Prelog (CIP) priority rules [6]. While very powerful, the CIP rules can also be difficult for even skilled chemists to interpret correctly. CIP descriptors may certainly be present in a diagram to indicate the absolute configuration, but should never be used as a replacement for proper stereochemical representation (hashed wedged and solid wedged bonds). Using a stereodescriptor as the sole indication of configuration would require both the author and the reader to know, understand, and implement the CIP rules correctly before determining the actual arrangement of the stereocenter’s ligands in space. It is not acceptable to place that burden on the reader when it can easily be eliminated with the inclusion of appropriate solid wedged or hashed wedged bonds. Obviously, if a CIP stereodescriptor is included in a diagram, extra care should be used to ensure that it is correct and that the stereodescriptor and the diagram are in agreement.
 |  |  |  | |||
| Preferred | Acceptable | Not acceptable | Wrong |
ST-0.8 Mixtures of diastereoisomers
There are a variety of obscure conventions for depicting arbitrary mixtures of diastereoisomers. The most common (but still obscure) of these conventions says that bold and hashed wedges should be used for absolute configuration, unwedged bold and unwedged hashed lines represent relative configuration and racemic character, while hollow wedges and dashed lines represent relative configuration only [7,8]. In 2002, Elsevier MDL added extensive support for relative tetrahedral configurations to their ISIS system [9]. Other conventions have been used by various other authors and by various chemical software applications. Yet other conventions have been used to describe relative configuration in nomenclature [10], although generally with little direct application to depiction conventions. At this point, there does not seem to be any consensus for a preferred depiction style. Given the lack of consensus among different systems and the poor general acceptance of any given one, the safest approach currently is to depict multiple structure diagrams explicitly, optionally accompanied by additional descriptive text as discussed in ST-6.3.
The recommendations presented here are primarily focused on the depiction of molecular entities that can be represented with a single structure diagram; a comprehensive discussion of arbitrary mixtures of diastereoisomers (and mixtures in general) is outside the scope of this document.
ST-1. TETRAHEDRAL CONFIGURATIONS
Saturated carbon atoms exist in tetrahedral configurations. Accordingly, the accurate representation of tetrahedral configuration is critical in organic chemistry.
ST-1.1 Tetrahedral configurations depicted with four explicit bonds
When depicting tetrahedral configuration around a stereogenic atom, the following depictions may be considered (ST-1.1.1 through ST-1.1.20, with preferred styles discussed first). As a whole, these depictions encompass every possible way to position four bonds in two dimensions. Each of these depictions may be freely rotated in the plane of the paper without affecting the configuration being represented.
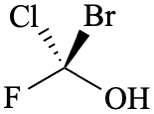
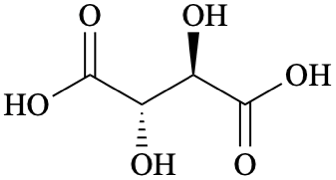
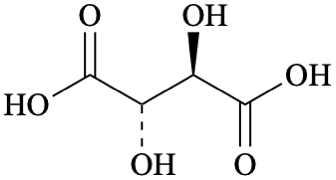
As a secondary rule in any of these depiction styles, if any pair of non-identical substituents attached to a single atom is arranged horizontally, the graphically larger substituent should be to the right of the smaller one for aesthetic purposes. In this context, “graphically larger” refers to the size of the substituent within the drawing itself. An “OH” atom label is graphically larger than an “I” atom label because it consists of two characters rather than one, even though the iodine atom might be physically larger than the hydroxy group in terms of its van der Waals radius.
Several of these depiction styles have three plain bonds, which in other cases would imply that those bonds are coplanar. In reality, tetrahedral configurations can never have three coplanar bonds. The use of three plain bonds in these cases is simply a matter of convention, and chemists will readily be able to understand the true tetrahedral nature of the center when any of the preferred or acceptable depiction styles is used.
If one of the four substituents attached to the stereogenic center is a simple hydrogen atom, it can often be omitted. Tetrahedral depictions with three explicit bonds (and an implicit hydrogen atom) are discussed in ST-1.2.
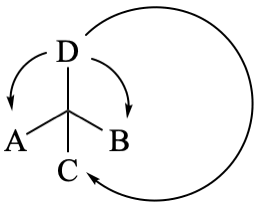
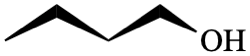
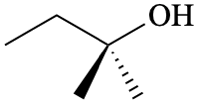
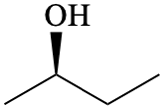
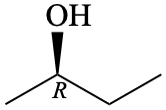
ST-1.1.1
Two plain bonds, one solid wedged bond, and one hashed wedged bond, with the two plain bonds depicted as adjacent and separated by less than 180° (ideally, 120° as shown here). Since the two plain bonds are depicted as adjacent, the hashed wedged and solid wedged bonds will also necessarily be depicted as adjacent, and they should be separated by less than the separation between the plain bonds (ideally, 60° as shown here).
The bisectors of the A-B and C-D angles should preferably be collinear. If they are not collinear, the depiction is still acceptable, but not preferred.
It may be noted that these depictions are not geometrically accurate in the strictest sense. If a tetrahedral center were positioned so that it was viewed orthogonal to the plane described by substituents A, B, and the central atom, then substituent D would completely obscure substituent C or vice versa. Nonetheless, chemists have long been trained to ignore that subtlety, and this remains among the preferred representations of tetrahedral configuration.
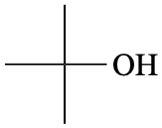
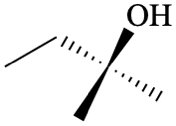
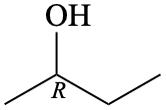
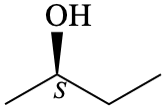
ST-1.1.2
Three plain bonds and one wedged bond, with each pair of plain bonds separated by less than 180° (ideally, 120° as shown here). The wedged bond can be positioned in any orientation but will usually bisect one of the other angles as shown here. Additionally, the substituent D at the end of the wedged bond should generally be among the graphically smallest (see ST-1.1) of the four.
Since in this style the drawing implies that the central atom is coplanar with substituents A, B, and C, it is technically incorrect in the strictest sense. In preference it should only be used for cases where the central atom is in a fused or bridged ring system.
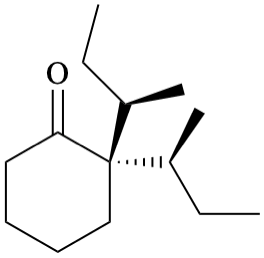
When at least two of the central atom’s substituent bonds are acyclic, there is not a strong preference between the use of the depiction styles in ST-1.1.1 (with two plain bonds, one solid wedged bond, and one hashed wedged bond) vs. those in ST-1.1.2 (with three plain bonds and one wedged bond). When at least two of the central atom’s acyclic substituents are also of similar graphical size (see ST-1.1), the depiction style of ST-1.1.1 is preferred.
On the other hand, when one of the central atom’s substituents is significantly larger than the other graphically, the style of ST-1.1.2 is preferred.
Often, however, either depiction style may be selected depending on the overall appearance desired by the author.
ST-1.1.3
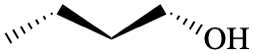
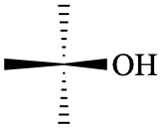
Two bonds of the same wedged type (solid wedged or hashed wedged) and one bond of another type (the opposite wedged type, or plain), with each adjacent pair separated by 90°, and with alternating bond types.
This depiction style is not preferred, but it is still acceptable.
ST-1.1.4
Three plain bonds and one wedged bond, with one pair of plain bonds separated by 180° or more and the wedged bond positioned within that largest space between plain bonds.
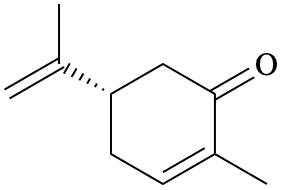
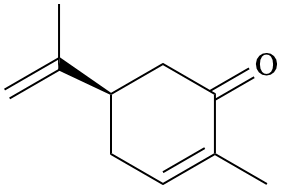
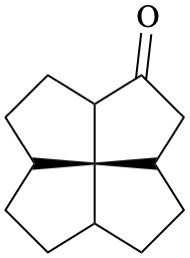
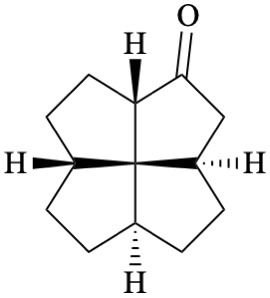
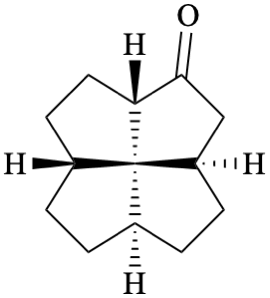
This depiction style should be used with caution. It is not acceptable for general usage. On the other hand, it is the preferred style when substituents A, B, and C are all part of the same small fused ring system. In depiction of ring systems, the constraints of the ring system determine the positioning of the three plain bonds and those constraints take precedence over other matters.
This depiction can be an acceptable style when just two of the plain bonds are within a ring, but only in rare cases where unusual bond angles are required to avoid extreme congestion, precluding the use of a style such as shown in ST-1.1.2. Even in these cases, it would be preferred to avoid this depiction style, and add a second stereobond for greatest clarity.
This depiction is technically unambiguous when the wedged bond is itself within a perspective ring system, with the wedged bond helping to indicate that perspective. However, as discussed in ST-3, it is preferred to use exclusively plain bonds in perspective diagrams. Solid wedged bonds should not be used to indicate individual stereogenic centers within a perspective ring system.
This depiction style must not be used when all four substituents are acyclic, since structures of this sort are ambiguous and cannot be interpreted reliably.
ST-1.1.5
Three bonds of the same wedged type (solid wedged or hashed wedged) and one bond of another type (the opposite wedged type, or plain), with each pair of identically wedged bonds separated by less than 180° (ideally, 120° as shown here). The fourth bond can be positioned in any orientation but will usually bisect one of the other angles as shown here.
Although these depictions are formally unambiguous, they should be avoided due to the over-abundance of wedged bonds.
ST-1.1.6
Two bonds of the same wedged type (solid wedged or hashed wedged) and one bond of another type (the opposite wedged type, or plain), with each adjacent pair separated by other than 90°, and with alternating bond types.
Although these depictions are formally unambiguous, they can be extremely confusing to the reader due to their infrequent use in the published literature. They should be avoided.
ST-1.1.7
One plain bond and two wedged bonds of the same type (either solid wedged or hashed wedged), each pair separated by less than 180°, and a fourth bond of the opposite wedged type positioned between the two similar wedged bonds.
Although these depictions are formally unambiguous, they should be avoided due to the over-abundance of wedged bonds.
ST-1.1.8
One plain bond and two wedged bonds of the same type (either solid wedged or hashed wedged), each adjacent pair separated by less than 180°, and a fourth bond of the opposite wedged type not positioned between the two similar wedged bonds.
Although these depictions are formally unambiguous, they should be avoided due to the over-abundance of wedged bonds.
ST-1.1.9
Three bonds of the same wedged type (solid wedged or hashed wedged) and one bond of another type (the opposite wedged type, or plain), with one adjacent pair of identically wedged bonds separated by 180° or more and the fourth bond positioned within that largest space between the identically wedged bond bonds.
These depictions are formally ambiguous and cannot be interpreted with certainty. They should never be used.
ST-1.1.10
Two plain bonds, one solid wedged bond, and one hashed wedged bond, with the two plain bonds separated by other than 180° and not depicted as adjacent.
These depictions are formally ambiguous and cannot be interpreted with certainty. They should never be used. Historically, they have been used in several situations that can sometimes be interpreted without certainty, but alternate acceptable representations are possible in all of those cases.
When depicting substituents at fusion atoms, one acceptable orientation of the substituent is vertically upwards/downwards from the atom, even if that places the substituent within the ring system (this is particularly common for steroids). Wedged bonds placed in this orientation may conflict with an opposite wedge on another of the fusion bonds. In such a case, that other fusion bond should be depicted using a plain bond.
Depictions of this type should never be used in bridged ring systems (ST-1.3.3).
ST-1.1.11
Two wedged bonds of the same type (either solid wedged or hashed wedged) and two plain bonds, with each adjacent pair of bonds separated by 180° or less, and with similar bond types depicted as adjacent.
These depictions are formally ambiguous and cannot be interpreted with certainty. They should never be used.
ST-1.1.12
One plain bond and two wedged bonds of the same type (either solid wedged or hashed wedged) and a fourth bond of the opposite wedged type positioned between the two similar wedged bonds, with one pair of adjacent bonds separated by 180° or more.
These depictions may represent square planar (ST-2.6), square pyramidal (ST-2.7), or see-saw configurations (ST-2.8). They may be formally unambiguous in some combinations of bond angles, but should be avoided regardless due to the overabundance of wedged bonds.
ST-1.1.13
Two plain bonds, one solid wedged bond, and one hashed wedged bond, with the two plain bonds depicted as adjacent and separated by 180°. Since the two plain bonds are depicted as adjacent, the hashed wedged and solid wedged bonds will also necessarily be depicted as adjacent.
This depiction represents a see-saw configuration (ST-2.8) rather than a tetrahedral one and is not acceptable for representing tetrahedral configurations.
ST-1.1.14
Two plain bonds, one solid wedged bond, and one hashed wedged bond, with the two plain bonds depicted as adjacent and separated by greater than 180°. Since the two plain bonds are depicted as adjacent, the hashed wedged bond and solid wedged bond will also necessarily be depicted as adjacent, and are positioned within the smaller angle described by the plain bonds.
This depiction represents a square pyramidal configuration (ST-2.10) rather than a tetrahedral one and is not acceptable for representing tetrahedral configurations.
ST-1.1.15
Two plain bonds, one solid wedged bond, and one hashed wedged bond, with the two plain bonds separated by 180° and not depicted as adjacent.
ST-1.1.16
Three plain bonds and one wedged bond, with one adjacent pair of plain bonds separated by 180° or more and the wedged bond not positioned within that largest space between plain bonds.
These depictions represent see-saw (ST-2.8) or square pyramidal (ST-2.6) configurations rather than tetrahedral ones and are not acceptable for representing tetrahedral configurations.
ST-1.1.17
Two solid wedged bonds and two hashed wedged bonds, with each adjacent pair of bonds separated by less than 180°, and with similar bond types depicted as adjacent.
ST-1.1.18
Two solid wedged bonds and two hashed wedged bonds, with one pair of identically wedged bonds separated by 180° or more and with the other pair positioned within the smaller angle described by the first pair.
These depictions represent square pyramidal configurations (ST-2.7) rather than tetrahedral ones and are not acceptable for representing tetrahedral configurations.
ST-1.1.19
Two wedged bonds of the same type (either solid wedged or hashed wedged) and two plain bonds, with the pair of plain bonds separated by more than 180°, and with the wedged bonds positioned within the smaller angle described by the first pair.
These depictions represent square pyramidal configurations (ST-2.7) rather than tetrahedral ones and are not acceptable for representing tetrahedral configurations.
ST-1.1.20
Four wedged bonds of the same type (either solid wedged or hashed wedged) positioned at any angles.
These depictions represent square pyramidal configurations (ST-2.7) rather than tetrahedral ones and are not acceptable for representing tetrahedral configurations.
ST-1.2 Tetrahedral configurations depicted with three explicit bonds
The drawing of a stereocenter containing a hydrogen atom will generally appear less encumbered if that substituent is omitted. Depictions of tetrahedral stereocenters with one hydrogen substituent can usually omit the explicit hydrogen atom (this is a change from earlier recommendations [1]), but it is always acceptable to display the hydrogen atom explicitly. Structure diagrams depicted with explicit hydrogen atoms are less ambiguous than those with implicit hydrogen atoms; however, the rigorous display of all explicit hydrogen atoms also adds to the overall congestion of a diagram and can quickly render a depiction illegible even for moderately sized diagrams.
Hydrogen atoms should be omitted from tetrahedral atoms only when the resulting structure diagram is unambiguous. In this context, it means that a substituent at the wide end of the wedged bond should have a maximum of two non-hydrogen substituents including the wedged bond itself. It is also acceptable to omit the hydrogen in cases where the substituent has more than two non-hydrogen substituents as long as the substituent itself is nonstereogenic. Care should be taken in that case, however, that the substituent cannot possibly be interpreted as being asymmetric, and should generally be limited to common small substituents such as unsubstituted rings, tert-butyl groups, and so on.
A trigonal pyramidal stereocenter may be considered as similar to a tetrahedral stereocenter having three explicit bonds, where the position of the fourth “bond” in the case of a trigonal pyramidal stereocenter is occupied by a lone pair rather than an implicit hydrogen atom. Depictions of trigonal pyramidal stereocenters are discussed more fully in ST-2.5.
When depicting tetrahedral configuration around a stereogenic center with three explicitly drawn bonds, the following depictions may be considered (ST-1.2.1 through ST-1.2.12, with preferred styles discussed first). As a whole, these depictions encompass every possible way to position three bonds in two dimensions.
ST-1.2.1
Two plain bonds and one wedged bond, with the pair of plain bonds separated by less than 180° (ideally, 120° as shown here) and the wedged bond opposing the A-B angle. Additionally, the substituent C at the end of the wedged bond should generally be among the graphically smallest (see ST-1.1) of the three.
The wedged bond should preferably bisect the A-B angle. If it is positioned otherwise, the depiction is still acceptable, but not preferred.
The implied hydrogen or lone pair in the first of these depictions is assumed to be behind the C substituent, thus:
ST-1.2.2
One plain bond, one solid wedged bond, and one hashed wedged bond, with the plain bond separated from one of its adjacent wedged bonds by 180° or more.
These depictions are acceptable, but not preferred because they can typically be drawn with fewer wedged bonds. If these depictions are used, the implied hydrogen is assumed to be positioned in the largest free angle:
ST-1.2.3
Two plain bonds and one wedged bond, with the pair of plain bonds separated by less than 180° and the wedged bond positioned within the smaller space between plain bonds.
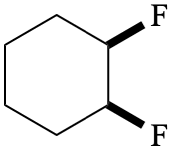
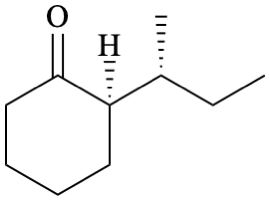
This depiction style should be used with caution. It is not acceptable for general usage. On the other hand, it is the preferred style when substituent C is a bridgehead bond of a bridged ring system. In depiction of ring systems, the constraints of the ring system determine the positioning of the three bonds and those constraints take precedence over other matters.
When substituents A and B are both within the same non-perspective ring, and the A-B angle is re-entrant (pointing “inward” relative to the ring), this depiction style is not acceptable and should be avoided. In such cases, it will never be clear to the user whether the wedged bond was intended to be interpreted in its normal sense or whether it was intended to be interpreted relative to the plane of the ring as depicted—and the two senses would result in opposite stereochemical configurations. This is discussed further in ST-1.4.
The implied hydrogen or lone pair in this depiction is assumed to be opposite the A-B angle relative to the C substituent. This leads to the observation that the absolute configuration of a tetrahedral configuration depicted with two plain bonds and one wedged bond is unchanged regardless of where the wedged bond is positioned, thus:
ST-1.2.4
Two plain bonds and one wedged bond, with the wedged bond separated from one of its adjacent plain bonds by 180° or more.
This depiction is technically unambiguous when used in a perspective ring system, with the wedged bond helping to indicate that perspective. However, as discussed in ST-3, it is preferred to use exclusively plain bonds in perspective diagrams. Wedged bonds should not be used to indicate individual stereogenic centers within a perspective ring system.
If these depictions are used, the implied hydrogen is assumed to be positioned in the largest free angle and connected to the central atom by a stereobond of the opposite type:
ST-1.2.5
One plain bond and two wedged bonds of the same type (either solid wedged or hashed wedged) positioned at any angles.
Although these depictions are formally unambiguous, they should be avoided due to the over-abundance of wedged bonds. In addition, these depictions can be difficult to interpret due to issues similar to those discussed in ST-1.2.3. If these depictions were used, the implied hydrogen would be assumed to be opposite the A-B angle relative to the C substituent:
ST-1.2.6
Three wedged bonds of the same type (either solid wedged or hashed wedged), with all pairs of adjacent bonds separated by 180° or less.
Although these depictions are formally unambiguous, they should be avoided due to the over-abundance of wedged bonds.
ST-1.2.7
Two wedged bonds of the same type (either solid wedged or hashed wedged) separated by 180° or more and one wedged bond of the opposite type positioned within the smaller angle described by the first two bonds.
Although these depictions are formally unambiguous, they should be avoided due to the over-abundance of wedged bonds.
ST-1.2.8
One solid wedged bond and one hashed wedged bond separated by 180° or more and one wedged bond of either type positioned within the smaller angle described by the first two bonds.
These depictions are formally ambiguous and cannot be interpreted with certainty. They should never be used.
ST-1.2.9
Three wedged bonds of the same type (either solid wedged or hashed wedged), with one pair of adjacent bonds separated by 180° or more.
These depictions are formally ambiguous and cannot be interpreted with certainty. They should never be used.
ST-1.2.10
One plain bond, one solid wedged bond, and one hashed wedged bond, with the plain bond separated from both of its adjacent wedged bonds by 180° or less.
These depictions represent trigonal planar configurations rather than tetrahedral ones and are not acceptable for representing tetrahedral configurations.
ST-1.2.11
Two wedged bonds of the same type (either solid wedged or hashed wedged) and one wedged bond of the opposite type, with all pairs of adjacent bonds separated by 180° or less.
These depictions represent trigonal planar configurations rather than tetrahedral ones and are not acceptable for representing tetrahedral configurations.
ST-1.2.12
Two plain bonds and one wedged bond, with the pair of plain bonds separated by 180°.
These depictions represent T-shaped configurations rather than tetrahedral ones and are not acceptable for representing tetrahedral configurations.
ST-1.3 Stereogenic centers in rings
Because of the importance of rings in organic chemistry, it is generally best to keep the ring system(s) as uncomplicated as possible while also preserving the clarity of any individual stereogenic centers within those rings.
ST-1.3.1: Stereogenic centers with two bonds in a ring
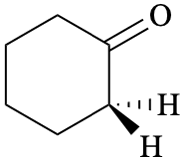
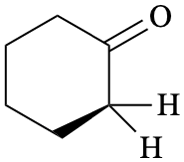
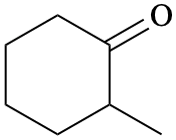
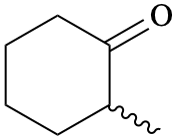
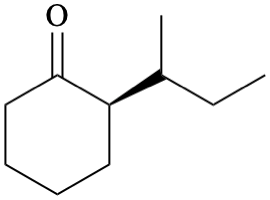
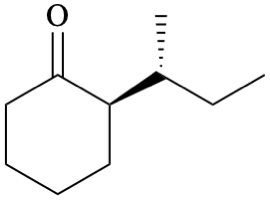
Stereogenic centers at ring atoms with a single non-hydrogen exocyclic substituent should usually be drawn with a wedged bond to that substituent and with the hydrogen implicit. The wedged bond should be positioned so that it bisects the larger angle between the two other ring bonds on that atom. However, also see below for a discussion of avoiding stereobonds between stereocenters.
Stereogenic centers at ring fusion atoms should be drawn with hashed wedged or solid wedged bonds to the exocyclic substituent at the fusion atom whenever possible. If necessary, an implicit hydrogen should be made explicit in order to provide an exocyclic substituent to bear the hashed wedged or solid wedged bond. When one of the fusion bonds is oriented vertically and the exocyclic substituent is graphically small (such as a hydrogen or a methyl group, or even such physically larger substituents as a phenyl group represented with a graphically small “Ph” group label), the exocyclic substituent is also preferentially oriented vertically and opposite to the vertical fusion bond. This orientation is preferred even if it results in the substituent being placed within the ring system, and is particularly common in the depiction of steroids and other natural products.
Stereogenic centers at bridgehead atoms pose several difficult problems. When depicting substituents at bridgehead atoms, some chemists have been tempted to depict the substituent atom using the wedged bond style that is opposite to the one used for the bridging bonds, apparently on the assumption that “if the bridge goes ‘up’, then the other substituent must go ‘down’.” In fact, if the ring system is oriented in the plane of the paper and the bridging bonds are oriented upwards, then the substituents are oriented upwards as well in systems where the bridge contains fewer atoms than any other path between the bridgehead atoms (as in the usual depiction of bicyclo[2.2.1]heptane). Such compounds should be depicted using solid wedged bonds or hashed wedged bonds for the bridging bonds, with the substituents depicted using plain bonds. The substituents may also be depicted using the same bond type as the bridging bonds. Although it would be technically unambiguous to depict the bridging bonds using plain bonds and reserve the solid wedged bonds and hashed wedged bonds for the substituents, that style should be avoided due to the longstanding confusion over its intended meaning.
When a bridged ring system has additional substituents at atoms other than the bridgehead atoms, it is best to depict the system so that those substituents are connected to atoms that have plain bonds within the ring system.
ST-1.3.4: Stereogenic centers at spiro fusion atoms
Stereogenic centers at spiro fusions are treated similarly to a ring with two exocyclic substituents. The two bonds associated with one of the rings in the spiro fusion should be drawn as plain bonds, while the two bonds associated with the other ring should be drawn with one solid wedged bond and one hashed wedged bond.
Stereogenic centers at spiro fusions involving rings of the same size are often depicted with one ring distorted toward the spiro axis. In such cases, the solid wedged and hashed wedged bonds should be associated with the distorted ring.
Stereogenic centers at spiro fusions that are themselves adjacent to other stereogenic atoms should be represented using one of the other preferred or acceptable depiction styles for tetrahedral configuration, so that wedged bonds are not depicted with stereogenic centers on both ends.
Although small ring systems are generally drawn as convex polygons, larger rings containing nine or more atoms are preferentially drawn as non-convex polygons, with two or more atoms “pointing inward” relative to the rest of the ring. As discussed in ST-1.2.3, it is not acceptable to depict tetrahedral configuration at re-entrant atoms when any other option is available.
Epoxides have commonly been depicted in ways that incorporate solid wedged bonds or hashed wedged bonds at re-entrant angles. Such depiction styles are not acceptable.
In some cases, there are few appealing alternatives to having stereogenic atoms at some re-entrant positions. Sometimes the only options require distorting in unusual shapes that lack the 120° and 108° angles normally seen between adjacent ring bonds. Such depictions are acceptable because of the importance of depicting stereogenic configurations unambiguously.
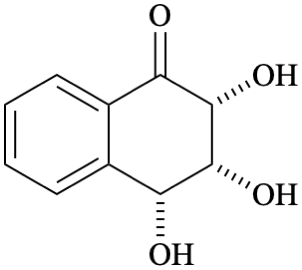
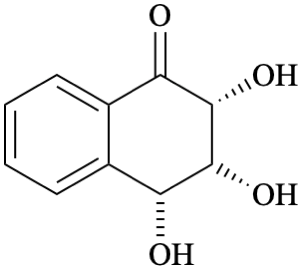
The antibiotic erythromycin A is a special case, since it has traditionally been depicted with 120° angles at each atom of its 14-membered ring, as shown below, even though that orientation results in two stereogenic centers at re-entrant atoms. Since its long history is unlikely to be discarded, that specific orientation must also remain acceptable for erythromycin A and closely related compounds. Even this form, however, should have each of the individual stereogenic centers depicted appropriately: the substituents at re-entrant positions should be directed inward relative to the ring, not outward.
The examples above also demonstrate that solid wedged bonds must be converted to hashed wedged bonds and vice versa when a re-entrant atom is converted to a more-standard convex environment.
ST-1.5 Tetrahedral stereocenters including higher-order bonds
Tetrahedral configuration requires a tetrahedral arrangement of ligands around a central point. It does not require that all of those ligands be connected to a central atom using single bonds. It is perfectly reasonable to have one or more ligands connected to the central atom using higher-order bonds. This is most commonly seen with chiral sulfoximides, phosphates, and related compounds, each of which is commonly drawn with one or more double bonds. Stereocenters of this type should be indicated by the appropriate placement of bold and/or hashed wedged bonds connecting the central atom to the singly bonded ligands. Although wedged and hashed double bonds have appeared in the literature, they are rarely required for chemical clarity, and their use is infrequent enough to be confusing to the casual viewer (see ST-2.5).
ST-1.6 Systems with an even number of consecutive double bonds
Systems with an even number of double bonds can be considered as having an axis of chirality or axial chirality. Four substituents of such a system form a distorted tetrahedral arrangement that can be considered as being formed by stretching a tetrahedron and inserting an even number of double bonds in between the two pairs of substituents. In contrast to a center of tetrahedral chirality (which requires four different substituents), an axis of chirality simply requires that the two substituents at each end of the axis be different even if one or both of the substituents on one end has an identical substituent on the opposite end.
These stereogenic units should be drawn using rules similar to those for regular atomic centers discussed in ST-1.1 and ST-1.2 with a difference that stereobonds must not be used on both ends of the cumulenic system. It is preferable to depict all four substituents explicitly when depicting the configuration of cumulenes, even if some of the substituents are hydrogen atoms.
It is also acceptable to leave hydrogen atoms implicit when bonded to unlabeled carbon atoms, as in ST-1.2.
It is unambiguous to depict a cumulenic system with three plain bonds and one hashed or wedged bond, so that depiction style is acceptable. It is, however, fairly unusual to have a plain bond on the same end of a cumulenic system as a solid wedged bond or a hashed wedged bond. This depiction style should be limited to cases when one of the atoms adjacent to the cumulenic system is itself a stereogenic center, in which case it is desirable to avoid drawing a stereobond between the cumulenic system and a second stereocenter.
The same guidelines apply for systems with consecutive double bonds containing elements other than carbon.
Hindered biaryls (such as 2,2′-disubstituted 1,1′-binaphthyl) represent yet another case of axial chirality. The additional substituents in this system constrain the aromatic rings so that they can no longer rotate freely, and such systems are described as having “hindered rotation”. As with cumulenic systems with an even number of double bonds, the stereogenic unit in hindered biaryls can be viewed as a distorted tetrahedron.
All biaryls with at least three substituents in the ortho positions have hindered rotation, as those substituents inhibit coplanarity at least to some extent.
Hindered biaryls should always be drawn with solid wedged and hashed wedged bonds within the aryl rings and directly connected to the single bonds about which they rotate. Preferably, one ring system of each pair should be drawn exclusively with plain bonds, and the other should be drawn with two solid wedged bonds, one directly connected to the rotating bond and one opposite. In even-membered systems, the bond between the solid wedged bonds should be depicted as bold and unwedged if it does not itself participate in a ring fusion. It is acceptable to depict the aryl systems with only a single wedged bond, as long as it remains directly connected to the single bond about which the aryl system rotates. Additional bonds within the aryl systems must remain plain and may not also be drawn with solid wedged or hashed wedged bonds.
The configuration of the biaryl system should not solely be represented by solid wedged and hashed wedged bonds to other ring substituents that are distant from the rotatable bond.
ST-1.8 Fischer projections
Fischer projections are characterized by one or more stereogenic centers surrounded by four plain bonds arranged in a plus-shaped pattern, with multiple adjacent stereogenic centers aligned vertically. They were originally proposed [11,12] for the depiction of carbohydrates, and they remain acceptable for the depiction of carbohydrates and their derivatives [5].
The use of Fischer projections in non-carbohydrates is problematic. Any drawings of this type are necessarily ambiguous since it is unclear whether the author of the drawing intended to make a Fischer projection or simply happened to draw a diagram in that orientation. Molecules depicted in the style of Fischer projections are likely to be recognized as such when they contain at least two acyclic stereogenic centers oriented vertically, although such interpretation is not guaranteed. Molecules containing a single stereogenic center pose even greater problems since it is often convenient to separate the four ligands by equal angles whether or not a single stereoisomer is intended.
In an earlier documents concerning polymers [13,14], a related depiction style was discussed in which asymmetric centers were aligned horizontally instead of vertically. That style is no longer preferred.
It is also worth noting that Fischer projections are the only representations of configuration that are not invariant with respect to rotation in the plane of the paper. In a Fischer projection, the horizontal bonds are oriented towards the observer and could have been represented with solid wedged bonds, while the vertical bonds are oriented away from the observer and could have been represented with hashed wedged bonds. When the projection is rotated 90°, the bonds to be interpreted as solid wedged bonds are interchanged with the ones interpreted as hashed wedged bonds. A Fischer projection rotated 90° represents the enantiomer of the original unrotated structure diagram; in all other cases, a rotated diagram is identical to a non-rotated one. “Horizontal Fischer projections” for non-polymers have never been acceptable.
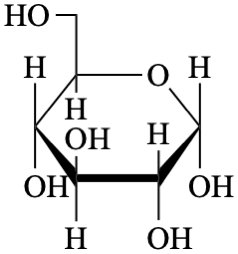
ST-1.9 Haworth projections
Haworth projections, like Fischer projections, are used primarily in depicting carbohydrates and structurally similar compounds such as inositols. These diagrams are characterized by a ring system viewed “in perspective”, with wedged and/or bold bonds.
As with perspective diagrams in general (ST-3.3), any drawings of this type are necessarily ambiguous since it is unclear if the author of the drawing intended to make a Haworth projection — with all of the associated implied configuration — or simply happened to draw a diagram in that orientation. Accordingly, these depictions should be used only when the viewer of the diagram is certain to understand that the diagram was intended to represent a Haworth projection. In general usage, it is always appropriate to use non-perspective depictions such as Mills diagrams (ST-1.10). Haworth projections should be avoided where ambiguity is possible, including when used in computer applications.
There are several subtypes of Haworth projections, including variations with and without hydrogen atoms. The wedges may be omitted entirely, but if they are present then the bottommost ring bond must additionally be drawn as bold.
It is also acceptable to depict the acyclic carbon atoms in a Fischer projection when the main carbohydrate ring is depicted in a Haworth projection.
ST-1.10 Mills depictions
An alternative to Haworth projections would be to draw the ring system according to standard conventions for depicting structure diagrams within a plane. In the context of carbohydrate chemistry, this “from above” drawing style is also known as the Mills depiction [15].
ST-1.11 H-Dot/H-Dash/H-Circle
The use of the H-Dot, H-Dash, and H-Circle symbols remains strongly deprecated. These symbols have been used to indicate the position of a hydrogen atom at a ring fusion, with the dot form representing a hydrogen above the plane of the ring and the dash or circle form representing a similar hydrogen below the plane of the ring.
Even when used, H-Dots, H-Dashes, and H-Circles are meaningful only when positioned on unsaturated ring-fusion carbon atoms containing a single exocyclic hydrogen substituent. They should never be used in any other circumstances.
ST-2. CONFIGURATIONS AT NON-TETRAHEDRAL ATOMS
Although tetrahedral configuration is by far the most common type of configuration among organic molecules, they are not the only type to consider. Many other configurations exist, primarily among inorganic compounds, and several of them are fairly common.
In the recommendations to follow, atom labels have been omitted from the structural diagrams at the ligand positions so that the orientation of the bonds may be seen most clearly. Traditionally, an unlabeled atom represents a carbon atom to organic chemists, but the unlabeled ligands here may represent any sort of element or chemical fragment, certainly including a carbon atom, but also potentially a hydrogen, a halogen, or any other element. These recommendations are concerned only with the geometry of the central atom, generally labeled with an “M” below. They apply regardless of the types of ligands, and regardless of whether the ligands are discrete entities (chelating substituents, for example, would have one or more ligating atoms linked to each other, either directly or through other atoms).
The depictions in this section labeled as “preferred” have been selected in order to satisfy two primary goals: they must be recognizable to most chemists, and they must not be readily confused with any other configuration. Thus, a depiction of a square pyramidal configuration must clearly indicate the pyramidal arrangement of its four ligands, and at the same time it must not suggest that the ligands might be arranged in a planar or tetrahedral configuration instead. In consequence, the depictions here follow many of the general precepts regarding the use of perspective to represent configuration that are discussed more fully in ST-3.
In accordance with the IUPAC revision of the Nomenclature of Coordination Compounds [16], polyhedral symbols that are tied to the presence of lone pairs (e.g., TBPY-3, TBPY>-4) are no longer recommended.
ST-2.1 Linear Polyhedral symbol L-2 Number of ligands: 2
Linear configurations have two ligands diametrically opposite to each other, separated by exactly 180°. Although depiction styles are discussed here, for practical purposes the only important detail is that the ligands be drawn in a linear fashion, as implied by this configuration name.
Isolated linear systems should be drawn horizontally. Linear fragments that are part of larger molecules should be positioned according to the needs of the larger system.
Because of their simplicity, many well-known linear systems are most commonly represented succinctly using formulas rather than explicit atoms and bonds. Since formulas do not convey any information about configuration (linear or otherwise), only the explicit atom-and-bond representations would be appropriate in the rare cases when the depiction of specifically linear configuration is desired.
ST-2.2 Angular Polyhedral symbol: A-2 Number of ligands: 2
An angular configuration has two ligands that are separated from each other by any angle other than 180°. Although depiction styles are discussed here, for practical purposes the only important detail is that the ligands not be drawn in a linear fashion, as implied by this configuration name.
Isolated angular systems should be drawn horizontally, with one bond extending upwards at a 30° angle rising from left to right, and the other bond extending downwards at the opposite angle. Angular fragments that are part of larger molecules should be positioned according to the needs of the larger system.
Because of their simplicity, many well-known angular systems can be represented succinctly using formulas rather than explicit atoms and bonds. Since formulas do not convey any information about configuration (angular or otherwise), only the explicit atom-and-bond representations would be appropriate in the rare cases when the depiction of specifically linear configuration is desired.
ST-2.3 T-shaped Polyhedral symbol: TS-3 Number of ligands: 3
T-shaped configurations have three ligands, so they must be clearly differentiated not only from trigonal pyramidal and trigonal planar configurations, but also from tetrahedral configurations that are drawn with an implicit hydrogen on the central atom. Although the T-shaped configuration does not technically need a depiction style of its own since all atoms are coplanar, it is useful to specify a recommended style to distinguish it from the other three-coordinate configurations. In other words, the recommended styles for a T-shaped configuration are not recommended for any of the other configurations.
Because they may also be mistakenly viewed as representing a tetrahedral configuration with one missing ligand, depictions of T-shaped configurations must clearly distinguish themselves from tetrahedral depictions with, for example, an implicit hydrogen on the central atom. Accordingly, these configurations must never be drawn with implicit ligands. All three ligands must be drawn so that they are connected to the central atom by explicit bonds, and the central atom must clearly be labeled as a single atom (that is, as “Br” vs. “BrCl” for example).
Furthermore, it is understood that the common organic elements carbon and nitrogen are virtually never found as the central atom in a T-shaped configuration. Even if a diagram is drawn in one of the recommended depiction styles below, it should not be considered to represent a T-shaped configuration if the central atom is a carbon or a nitrogen.
Because the recommended depiction style lacks any solid wedged or hashed wedged bonds, there is no way to distinguish visually a T-shaped structure of known configuration from one of unknown configuration. T-shaped structures of unknown axial/equatorial configuration should be described textually by using the (TS-3) prefix before the systematic name or formula, but no attempt should be made to draw them graphically.
In the recommended depictions, three plain bonds extend from the center exactly horizontally or exactly vertically.
The T-shaped configuration is inherently planar. Depictions that involve solid wedged or hashed wedged bonds, even though formally correct, are discouraged.
Sample depiction of a compound known to exist in T-shaped configuration:
Trigonal planar configurations also have three ligands, and share many of the concerns seen with T-shaped configurations. They must be clearly differentiated not only from T-shaped and trigonal pyramidal configurations, but also from tetrahedral configurations that are drawn with an implicit hydrogen on the central atom. Although this configuration does not technically need a depiction style of its own since all atoms are coplanar, it is useful to specify a recommended style to distinguish it from the other three-coordinate configurations. In other words, the recommended styles for a trigonal planar configuration are not recommended for any of the other configurations.
Because they may also be mistakenly viewed as representing a tetrahedral configuration with one missing ligand, depictions of trigonal planar configurations must clearly distinguish themselves from tetrahedral depictions with, for example, an implicit hydrogen on the central atom. Accordingly, these configurations must never be drawn with implicit ligands. All three ligands must be drawn so that they are connected to the central atom by explicit bonds, and the central atom must clearly be labeled as a single atom (that is, as “B” vs. “BF”, for example).
In the recommended depictions, three plain bonds extend from the center with equal angular spacing between them.
It is worth noting that sp2 carbons are amongst the more common examples of trigonal planar configurations. In the case of an sp2 carbon, the central atom does not need to be labeled. Further information about depiction of sp2 carbons and related systems may be found in the double-bond configuration recommendations in ST-4.
Unfortunately, although the simplest and most accurate way to represent trigonal planar configurations is using three plain bonds as above, that leaves no way to distinguish a configuration that is explicitly known to be trigonal planar from an arbitrary three-coordinate center of unknown configuration, which might also be depicted with three plain bonds. When it is necessary to emphasize that a three-coordinate system definitely is in a trigonal planar configuration, it should be depicted with one plain bond, one solid wedged bond, and one hashed wedged bond. The solid wedged bond and the hashed wedged bond should be separated by an angle that is significantly less than 120°, and ideally close to 60° as shown here. The bisector of the angle between the solid wedged bond and the hashed wedged bond must be collinear with the plain bond. If the plain bond is oriented horizontally, the solid wedged bond should be positioned below the hashed wedged bond.
Sample depiction of a compound known to exist in trigonal planar configuration:
Trigonal pyramidal configurations have three ligands, but are perhaps the most difficult configurations to depict unambiguously. Because they may also be viewed as representing a tetrahedral configuration with one missing ligand, depictions of trigonal pyramidal configurations must clearly distinguish themselves from tetrahedral depictions with, for example, an implicit hydrogen on the central atom. Accordingly, as with T-shaped configurations, trigonal pyramidal configurations must never be drawn with implicit ligands. All three ligands must be drawn so that they are connected to the central atom by explicit bonds, and the central atom must clearly be labeled as a single atom (that is, as “N” vs. “NH”, for example).
In the first recommended depiction, a plain bond and a hashed wedged bond form an angle between them of greater than 90° but less than 180°. The third bond is drawn as a solid wedged bond between the first two, but separated from the plain bond by greater than 90°.
In the second recommended depiction, two bonds are drawn as plain bonds, separated by an angle less than 180°. The third bond is drawn as a solid wedged bond or a hashed wedged bond, positioned at any angle. The third bond will traditionally bisect the angle formed by the plain bond, positioned either between them or opposite them, but such positioning is not mandatory.
This depiction style is very similar to depiction styles recommended for tetrahedral configurations. That is appropriate, since a trigonal pyramidal configuration does correspond to a tetrahedral configuration with one fewer ligand. This depiction style must therefore not be used in cases where the central atom might incorrectly be interpreted as having a fourth ligand.
A third depiction consists of one plain bond and two other bonds that are drawn both as solid wedged bonds or both as hashed wedged bonds, with each adjacent pair of atoms separated by less than 180°. This style, while formally correct, is discouraged because it has many stereobonds and may be confusing to the reader.
A related depiction consists of a plain bond, a solid wedged bond, and a hashed wedged bond, where the bisector of the angle formed by the solid and hashed wedged bonds is collinear with the plain bond. This should be avoided, as it actually describes a planar rather than a pyramidal configuration.
Trigonal pyramidal atoms should never be drawn with an explicit lone pair at the end of a bond because that bond could be misinterpreted as an additional methyl group. If the lone pair needs to be displayed explicitly, for example, when describing a reaction mechanism, it should be depicted immediately adjacent to the corresponding atom.
In rare cases, a trigonal pyramidal atom with at least one double bond may be flanked by other stereocenters at the other ends of all of its single bonds. In such cases, one of the plain bonds should be changed to a wedged bond even though it joins two stereocenters. It is also acceptable to use a solid wedged or hashed wedged double bond, but that would not be preferred because wedged double bonds are so rarely seen in the literature.
Sample depictions of compounds known to exist in trigonal pyramidal configuration:
ST-2.6 Square planar Polyhedral symbol: SP-4 Number of ligands: 4
Square planar configurations have four ligands, the same as tetrahedral ones. One of the key issues in depicting these configurations is in making clear that a square planar configuration really is intended, and not a tetrahedral one. The recommended depictions are explicitly recommended not to be used for tetrahedral configurations.
The first recommended depiction should be drawn with two solid wedged bonds and two hashed wedged bonds. The two solid wedged bonds should be positioned below the central atom, while the two hashed wedged bonds should be positioned above. The angle between the solid wedged bonds should be equal to the angle between the hashed wedged bonds, and the bisectors of both angles should be coincident with the y-axis. Additionally, the angle between the solid wedged bonds should be greater than 90°, which implies that the angle between either solid wedged bond and its adjacent hashed wedged bond should be less than 90°.
It is also acceptable to draw similar structures with plain bonds. There are some cases where this drawing style would even be preferred, particularly when all four bonds are required to be in the plane of the paper by virtue of other aspects of the structural diagram (such as with the central atom of metalloporphyrins). When square planar configurations are drawn with plain bonds, it is preferable to have the angle between the bonds be exactly 90°, and, as previously, the bisectors of angles formed by adjacent bonds should be coincident with the x- and y-axes. The similar depiction with the bonds themselves positioned along the axes is acceptable but should be avoided as it is extremely commonly used to represent tetrahedral centers, either if the tetrahedral configuration is nonstereogenic (carbon tetrachloride) or in Fischer projections.
Four other depictions are formally correct, but are often used as (incorrect) depictions of tetrahedral configuration, particularly in bridged ring systems.
Highly distorted configurations with one pair of adjacent bonds separated by 180° or more and of different bond type (ST-1.1.12) are confusing at best and not acceptable under any circumstances.
Sample depictions of compounds known to exist in square planar configuration:
ST-2.7 Square pyramidal Polyhedral symbol: SPY-4 Number of ligands: 4
Square pyramidal configurations represent yet another type that has four ligands, the same as tetrahedral ones. Again, one of the key issues in depicting these configurations is in making clear that a square pyramidal configuration really is intended, and again the recommended depictions are explicitly recommended not to be used for a tetrahedral configuration.
Furthermore, it is understood that carbon is virtually never found in a square pyramidal configuration. Even if a diagram is drawn in one of the recommended depiction styles below, it should not be considered to represent a square pyramidal configuration if the central atom is isoelectronic with any member of the carbon group. Central atoms of that group are almost always found in tetrahedral configurations rather than square pyramidal configuration.
The first recommended depiction should be drawn with two solid wedged bonds and two hashed wedged bonds. The two solid wedged bonds should be positioned below the central atom, and the two hashed wedged bonds should also be positioned below the central atom. The angle between the solid wedged bonds should be less than to the angle between the hashed wedged bonds, and the bisectors of both angles should be coincident with the y-axis.
To further emphasize the perspective implied by the solid wedged and hashed wedged bonds, the two solid wedged bonds may be adjusted so that they are slightly longer than but less than 150 % of the length of the hashed wedged bonds.
Sample depiction of a compound known to exist in square pyramidal configuration:
A see-saw configuration, like a square pyramidal one, can be very difficult to distinguish from a tetrahedral configuration. Yet again, one of the key issues in depicting these configurations is in making clear that a see-saw configuration really is intended, and again the recommended depictions are explicitly recommended not to be used for a tetrahedral configuration.
Furthermore, it is understood that carbon is virtually never found in a see-saw configuration. Even if a diagram is drawn in one of the recommended depiction styles below, it should not be considered to represent a see-saw configuration if the central atom is isoelectronic with any member of the carbon group. Central atoms of that group are almost always found in tetrahedral configurations rather than see-saw configuration.
The first recommended depiction should be drawn with two plain bonds extending exactly vertically above and below the center. A solid wedged bond should extend downwards from the center, and a hashed wedged bond should similarly extend upwards so that the bisector of the angle formed by the solid and hashed wedged bonds is coincident with the x-axis.
An acceptable variant on this preferred depiction would be to slant the plain bonds a small but equal amount from the vertical, so that they lean towards the solid and hashed wedged bonds. The plain bonds should remain closer to the y-axis than they are to the solid and hashed wedged bonds.
The third preferred depiction should be drawn with two plain bonds extending exactly horizontally to the left and the right of the center. A solid wedged bond and a hashed wedged bond should extend downwards from the center so that the bisector of the angle formed by the solid and hashed wedged bonds is coincident with the y-axis.
An acceptable variant on this preferred depiction would be to slant the plain bonds a small but equal amount from the horizontal, so that they lean towards the solid and hashed wedged bonds. The plain bonds should remain closer to the x-axis than they are to the solid and hashed wedged bonds.
An alternative preferred style draws similar structures with plain bonds, particularly when at least one of the equatorial bonds is a double or triple bond. In this case, however, the axial bonds must be collinear, to distinguish this configuration from a square pyramidal one. Four plain bonds may be used only if the see-saw center is not itself chiral or if its absolute configuration is unknown. A molecule with see-saw configuration of known chirality must be drawn with solid wedged bonds and hashed wedged bonds in order to confirm the specific chirality of the central atom.
Six other depictions are formally correct, but are often used as depictions of tetrahedral configuration, and should be avoided as to reduce confusion.
Highly distorted configurations with one pair of adjacent bonds separated by 180° or more and of different bond type (ST-1.1.12) are confusing at best and not acceptable under any circumstances.
Sample depictions of compounds known to exist in see-saw configuration:
ST-2.9 Trigonal bipyramidal Polyhedral symbol: TBPY-5 Number of ligands: 5
Trigonal bipyramidal configurations have five ligands, and offer fewer problems of interpretation than configurations with three or four ligands.
The preferred depiction views the bipyramid axis from the side. In this case, the two axial bonds are drawn as plain bonds oriented vertically and a third bond is also drawn as a plain bond, oriented exactly at right angles to the two axial bonds and extending to either the left or the right. The fourth bond is drawn as a solid wedged bond extending opposite the third bond and downwards from the center, while the fifth bond is drawn as a hashed wedged bond opposite the third bond and extending upwards from the center. The bisector of the angle formed by the fourth and fifth bonds is coincident with the x-axis.
It is also acceptable to draw similar configurations with plain bonds if the trigonal bipyramidal center is not itself chiral or if its absolute configuration is unknown. A molecule with trigonal bipyramidal configuration of known chirality must be drawn with solid wedged bonds and hashed wedged bonds in order to confirm the specific chirality of the central atom.
A third depiction shows the bipyramid axis viewed from above. In this case, the three equatorial bonds are drawn as plain bonds with equal separation. The fourth bond is drawn as a solid wedged bond extending downwards from the center. The fifth bond is drawn as a hashed wedged bond that is collinear with the fourth bond, and hence extending upwards. This depiction is acceptable but not preferred. It is used primarily in cases where it is useful to emphasize the coplanarity of the equatorial ligands.
A fourth case, also viewed “from the side”, is considered not acceptable. In this case, the third and fourth bonds are drawn as solid wedged bonds, both extending downwards from the center, with the bisector of the angle formed by those bonds coincident with the y-axis. The fifth bond is drawn as a hashed wedged bond extending upwards from the center. A variation of this case has hashed wedged bonds drawn instead of solid wedged bonds and solid wedged bonds drawn instead of hashed wedged bonds; it is also considered not acceptable.
A fifth case, also viewed “from the side” is also considered not acceptable. In this case, the third and fourth bonds are drawn as hashed wedged bonds, both extending upwards from the center, with the bisector of the angle formed by those bonds coincident with the y-axis. The fifth bond is drawn as a solid wedged bond extending downwards from the center. A variation of this case has hashed wedged bonds drawn instead of solid wedged bonds and solid wedged bonds drawn instead of hashed wedged bonds; it is also considered not acceptable.
Sample depictions of compounds known to exist in trigonal bipyramidal configuration:
ST-2.10 Square pyramidal Polyhedral symbol: SPY-5 Number of ligands: 5
Square pyramidal configurations with five ligands have the same number of ligands as trigonal bipyramidal configurations, but the configurations themselves are different enough that confusion is rare.
The first recommended depiction views the pyramid from the front. This depiction should be drawn with two solid wedged bonds and two hashed wedged bonds. The two solid wedged bonds should be positioned below the central atom, while the two hashed wedged bonds should also be positioned below, but above the two solid bonds. The bisectors of both angles should be coincident with the y-axis. The fifth bond is drawn as a plain bond extending exactly upwards from the center. This depiction emphasizes the noncoplanarity of the central atom with the four equatorial ligands and should not be used when it is known that the central atom is coplanar with them.
The second recommended depiction also views the pyramid from the front. This depiction should be drawn with two solid wedged bonds and two hashed wedged bonds. The two hashed wedged bonds should be positioned above the central atom, while the two solid wedged bonds should also be positioned above, but below the two solid bonds. The bisectors of both angles should be coincident with the y-axis. The fifth bond is drawn as a plain bond extending exactly downwards from the center. This depiction emphasizes the noncoplanarity of the central atom with the four equatorial ligands and should not be used when it is known that the central atom is coplanar with them.
The next two recommended depictions view the pyramid from the front. These depictions should be drawn with two solid wedged bonds and two hashed wedged bonds. The two solid wedged bonds should be positioned below the central atom, while the two hashed wedged bonds should be positioned above. The angle between the solid wedged bonds should be equal to the angle between the hashed wedged bonds, and the bisectors of both angles should be coincident with the y-axis. The fifth bond is drawn as a plain bond extending exactly upwards or exactly downwards from the center. These depictions (and all of the subsequent ones) emphasize the coplanarity of the central atom with the four equatorial ligands and should not be used when it is known that the central atom is not coplanar with them.
A fifth depiction views the pyramid from the top. Four bonds are drawn as plain bonds, with equal angular spacing between them. The fifth bond is drawn as a solid wedged bond that may be positioned at any angle. This depiction is acceptable but not preferred for most cases. It is used primarily in cases where it is useful to emphasize the coplanarity of the equatorial ligands, and would be preferred primarily when all four bonds are required to be in the plane of the paper by virtue of other aspects of the structural diagram (such as with the central atom of metalloporphyrins). When square pyramidal configurations are drawn in this configuration, it is preferable for the bisectors of angles formed by adjacent bonds to be coincident with the x- and y-axes. The similar depiction with the bonds themselves positioned along the axes is acceptable but should be avoided.
The sixth acceptable depiction views the pyramid from a corner. Two bonds are drawn as plain bonds, extending exactly horizontally in either direction from the center. The third bond is drawn as a solid wedged bond extending downwards from the center. The fourth bond is drawn as a hashed wedged bond that is collinear with the third bond, and therefore extending upwards from the center. The fifth bond is drawn as a plain bond extending exactly vertically upwards or from the center. As in the previous depiction, this would most commonly be used when all the axial and two equatorial bonds are required to be in the plane of the paper by virtue of other aspects of the structural diagram (such as with the central atom of metalloporphyrins).
Sample depictions of compounds known to exist in square pyramidal configuration:
ST-2.11 Octahedral Polyhedral symbol: OC-6 Number of ligands: 6
Octahedral configurations are by far the most common for six ligands.
The first recommended depiction should be drawn with two solid wedged bonds positioned below the central atom, while two hashed wedged bonds should be positioned above. The angle between the solid wedged bonds should be equal to the angle between the hashed wedged bonds, and the bisectors of both angles should be coincident with the y-axis. Finally, two plain bonds should extend exactly vertically, upwards and downwards from the center.
It is also acceptable to draw similar configurations with plain bonds if the octahedral center is not itself chiral or if its absolute configuration is unknown. A molecule with octahedral configuration of known chirality must be drawn with solid wedged bonds and hashed wedged bonds in order to confirm the specific chirality of the central atom.
A fourth depiction should be drawn with four plain bonds. Two of those should extend exactly vertically, one each above and below the center. Two others should extend exactly horizontally, one each to the left and to the right of the center. A fifth bond should be drawn as a solid wedged bond, extending downwards from the center either to the left or the right. The sixth bond should be drawn as a hashed wedged bond, positioned collinear with the fifth, and therefore extending upwards from the center. It is also acceptable for the plain bonds to be rotated by 45°, so that the bisectors of angles formed by adjacent plain bonds are coincident with the x- and y-axes.
Sample depictions of compounds known to exist in octahedral configuration:
ST-2.12 Trigonal prismatic Polyhedral symbol: TPR-6 Number of ligands: 6
Trigonal prismatic configurations are rather uncommon, and can be distinguished from octahedral configurations without much problem.
The recommended depiction should be drawn with two solid wedged bonds, two hashed wedged bonds, and two plain bonds. The two solid wedged bonds should be positioned to the right of the central atom, and the bisectors of the angle formed by these bonds should be coincident with the x-axis. The two hashed wedged bonds should be placed similarly, with the angle between them sufficiently larger or smaller than the angle between the solid wedged bonds so as to avoid overlap. The two plain bonds should be placed collinear with the two hashed or solid wedged bonds that form the smaller angle, and hence should extend to the left of the center. Similar depictions with the left and right sides reversed are also acceptable.
To further emphasize the perspective implied by the solid and hashed wedged bonds, the two solid wedged bonds may be adjusted so that they are slightly longer than but less than 150 % of the length of the hashed wedged bonds.
Two other depictions are formally correct, but are discouraged because they have so many stereo-bonds as to be confusing to the reader.
The two depictions shown below should be strongly avoided because they imply that the central atom is coplanar with four of its ligands.
Sample depictions of compounds known to exist in trigonal prismatic configuration:
ST-2.13 Higher coordination numbers Number of ligands: 7 and higher
The coordination geometry of centers with more than six ligands quickly becomes difficult to depict in two dimensions. The configuration of an atom with 7 or more ligands is most commonly depicted as a polyhedral solid, showing lines between ligands and not showing the central atom.
ST-3. USE OF PERSPECTIVE TO INDICATE CONFIGURATION
Most often, the three-dimensionality of molecular entities can simply be ignored when creating structural diagrams. Thus, cyclohexane is often drawn as a regular hexagon even though its prevailing chair conformation is far from planar. Sometimes, however, three-dimensional configuration is critical, and accurate interpretation of that configuration from a two-dimensional diagram is critical to understanding the properties or behavior of a molecular entity. Perspective drawings are most often used in bridged ring systems. There are many cases where perspective drawings are highly appropriate (bicyclo[2.2.1]heptane) or unavoidable without significant distortion of the parent structure (cubane, pagodane, buckminsterfullerene).
The biggest caveat with regard to perspective drawings is straightforward: perspective is a difficult concept. The artwork of M. C. Escher [17] famously demonstrates the ambiguities that can easily arise from the use and misuse of perspective. Even when used completely properly, perspective diagrams of molecular entities rely on subtle visual cues to impart significant changes of meaning in portions of the diagram that are far removed from those cues. In the first depiction of the adamantane analog below, for example, the single bond crossing implies the configuration of all four bridgehead atoms.
Human researchers, for the most part, are trained to understand perspective diagrams and can usually interpret them properly. Unfortunately, computer interpretation of chemical structure diagrams is not as advanced. At the current time, few computer-based software packages will recognize perspective at all, let alone recognize it accurately and completely. For this reason, although perspective-based diagrams can be quite useful for humans, they should still be avoided in situations where accurate computer interpretation is important.
ST-3.1 Restrictions on perspective drawings
Except where the author specifically wants to convey a three-dimensional concept, the use of perspective drawings should be limited to ring systems, and should usually be further limited to bridged ring systems.
Perspective drawings of ring systems should normally be drawn “from above and from the right”, so that the nearer atoms of a mostly-horizontal ring are positioned lower in the drawing than those that are further away. As a guide to the viewer, the front-to-back ordering of crossing bonds must be indicated. That ordering is depicted with a small discontinuity in the backmost bond.
The similar style drawn “from above and from the left” is acceptable, but not preferred because the “from above and to the right” style is much more prevalent in common usage.
When present, the discontinuity should always be clear and unambiguous. For printed materials, that will generally mean that the discontinuity should be at least twice as wide as the width of a single bond. In low-resolution usages (e.g., in GIF or JPEG files on the web or in documents that are expected to be faxed), the discontinuity may need to be larger so that it doesn’t risk disappearing due to blurring of the drawing.
ST-3.2 Configuration in perspective drawings
At a basic level, a perspective drawing is a simple projection of a three-dimensional structure into a two-dimensional plane. A well-drawn projection always can be interpreted as implying the absolute configuration specified by the original three-dimensional structure. A disubstituted bicyclo[2.2.1]hept-5-en-2-one may be depicted as shown, with a bond crossing shown explicitly.
Perspective drawings must always be interpreted as representing absolute configuration at all stereogenic centers without attached wavy bonds (and in the absence of other textual description — see ST-6 for examples). It is acceptable to further emphasize those stereocenters with additional solid wedged or hashed wedged bonds, but it is not necessary to do so.
When solid wedged or hashed wedged bonds are used, however, they must be used in agreement with other configurational details implied by the perspectivity.
If absolute configuration is wholly unknown, a perspective drawing should not be used, and a flat depiction style should be used instead.
Since perspective diagrams imply a single absolute configuration, it is not necessary to use solid wedged or bold bonds to emphasize that configuration further. In some cases, such bonds may help an inexperienced viewer to understand the perspective used. However, such benefits are counterbalanced by the ambiguities introduced by depictions that incorporate stereobonds connecting two stereocenters.
Only solid wedged and bold bonds should be used for the purpose of emphasizing perspective. Hashed wedged bonds and hashed unwedged bonds should not be used, either in isolation or in combination with bold bonds.
In general usage it is always appropriate to use a non-perspective diagram, in which case solid wedged and hashed wedged bonds would be used normally to indicate configuration. Such a diagram, of course, does not convey specific conformation, and a perspective diagram would be desired when it is necessary to depict both conformation and configuration.
Double-bond configuration is directly related to the positioning of substituents relative to the double bond itself. Double bonds (and related systems) have a maximum of four substituents, a maximum of two on each end of the double bond. Compared to a substituent on the other end of the double bond, a substituent on one end may be on the same (cis) or the opposite (trans) side. This description implies that rotation around the double bond is hindered, and that the positions of the two substituents on one end are indeed fixed relative to the other end. Determination of whether a given double bond really does have hindered rotation is beyond the scope of this document; if the double bond does not have hindered rotation, it does not have double-bond configuration and the depiction recommendations discussed here would not apply. Some double bonds do not specify configuration at all; such double bonds typically have a non-sp2-hybridized atom at one or both ends (see ST-1.5 for some examples), and the discussions in this section are not relevant to double bonds of that type.
ST-4.1 Positioning of substituents on double bonds
Double bonds are planar, and so should preferably be depicted with plain bonds at all substituents.
Substituents consisting of a hydrogen atom may be omitted according to standard conventions regarding the use of implicit hydrogen atoms. Substituents consisting of a lone pair will also generally be omitted. When a substituent is omitted from the drawing, it is assumed to be positioned on the side of the double bond opposite to an existing substituent on the same atom.
For sterically unstrained, acyclic double bonds, the angle between substituents should generally be close to 120° as shown. Double bonds with highly congested substituents and double bonds in rings other than six-membered rings will commonly have angles other than 120°. In no case, however, should two substituents on the same atom of a double bond be positioned on the same side of the bond in acyclic systems.
Double-bond-like systems are not restricted to isolated double bonds. The same issues apply to any systems containing up to four coplanar substituents with at least one on each end of a central axis. Extended cumulenic systems with an odd number of bonds describe one such family (similar systems with an even number of double bonds exhibit axial chirality instead).
In some cases, it may be necessary to draw a double bond viewed from a non-standard orientation. This is particularly true in perspective drawings and in depictions of bridged ring systems. Whenever possible in such cases, the local configuration of the double bond as drawn should match the actual configuration intended. That is, a cis double bond with two substituents should always be drawn with both of those substituents on the same side of the bond, regardless of the orientation of the bond itself.
That said, a viewer should generally expect that any double bond within a ring containing six or fewer atoms will be in a cis configuration relative to the ring. In small rings of this type, the depiction of a trans bond when it could otherwise be drawn as cis only adds extra confusion for the viewer.
Interpretation is much more of an issue in slightly larger ring systems where both cis and trans orientations are possible. Although small ring systems are generally drawn as convex polygons, larger rings containing nine or more atoms are preferentially drawn as non-convex polygons, with four or more bonds oriented trans rather than cis. Double bonds in large rings must always be drawn in the configuration that is intended, even if that requires that the ring system itself be depicted in a different shape.
ST-4.4 Double bonds of unspecified configuration
It is often useful to be able to depict a double bond of unspecified configuration, such as the structure of “but-2-ene” as distinct from “(2Z)-but-2-ene” and “(2E)-but-2-ene”. There are at least three different conventions that have been used to depict these configurations.
The simplest option is to draw the double bond and its substituents linearly. This depiction style should only be used when the double bond has exactly two substituents, one on each end. When possible, the double bond itself should be arranged horizontally. If the entire structure is linear, it may be represented in textual form instead, without any explicit bonds. In practice, linear styles are primarily used for small molecules, although they are acceptable for structures of any size.
The most common convention for depicting double bonds with unspecified configuration in molecules of all sizes uses a wavy bond (ST-0.4) adjacent to the double bond. Under no circumstances, however, should the wavy bond join the double bond to another stereogenic center.
This style is usually used only in cases where the double bond has a single substituent on one or both ends; the wavy bond would preferably be positioned on that substituent.
If that single substituent connects the bond to another stereogenic center, however, the wavy bond must not be positioned there, and instead should be placed on the other end of the double bond.
If a wavy bond is used on the end of a double bond that has two substituents, both substituents should preferably be depicted with a wavy bond.
If one of those substituents, however, has another stereogenic center at the connection atom, that bond should remain plain to eliminate any potential confusion about whether the wavy bond is associated with the double bond on one end or the second stereogenic center on the other.
In rare cases, it is impossible to depict an unspecified double bond configuration either by drawing the substituents linearly or by using wavy bonds. In those cases, it is clearest to depict the two configurations as two separate molecular entities separated by the text “and/or”.
A crossed double bond has sometimes been used to indicate unspecified double bond configuration or a mixture of configurations. This type of bond is not considered acceptable for general use, although it may still be required by some computer software.
ST-4.5 Double bonds with implicit bonds to substituents
Implicit substituents — that is, where one or more substituents are “contracted” into an atom label at one end of the bond or the other — are an acceptable way to indicate unspecified configuration in unsymmetrically substituted double bonds. Authors should keep in mind, however, that the positioning of the contracted label may imply a specific configuration to the casual reader. For example, the fifth diagram below might be seen as implying an unintended trans configuration. For greatest clarity, substituents on double bonds should preferably be drawn with explicit bonds.
ST-5. OTHER CONFIGURATIONS
Beyond configuration associated with a central atom or bond, there are some types of configuration that are dependent on the relationships between larger portions of a molecular entity. These are less frequently described, and tend to be explained clearly in associated text when they are used.
Molecules with planar chirality have some portion of their structure that is planar or nearly so, where that portion is not symmetric with respect to rotation within its plane, and some other portion of the structure with fixed orientation relative to that plane. Most commonly that is accomplished by some sort of bridging configuration over the planar system in a way that prevents further rotation.
Molecules with planar chirality should be depicted in accordance with the earlier recommendations for the depiction of perspective structures. In planar chirality, the most important information is to distinguish the portions of the structure that are in the plane from those that are out of it. Typically, the planar portions are depicted as perpendicular to the plane of the paper, in which case they would include solid wedged bonds to indicate perspective. Alternatively, the planar portions may be depicted within the plane of the paper, in which case the portions connected directly to the planar parts would be indicated with solid wedged bonds.
Helicenes are extended fused systems that are forced out of planarity when the fused system “loops back” on itself, forming a helical or screw-shaped figure in three dimensions. The non-planarity should be indicated by a pair of solid wedged bonds on one end of the helix separated, in even-membered rings, by another that is depicted as bold and unwedged. It is additionally acceptable to display a corresponding pair of hashed wedged bonds on the other end of the helix. In no cases should solid wedged or hashed wedged bonds be present anywhere but at the termini of the helix.
Möbius bands also exist in two enantiomers, in this case determined by the direction of the half-twist. Unlike helicenes, there is no “end” to a Möbius band, so any indication of configuration must necessarily be somewhere in the middle.
It is preferred to indicate configuration simply by the front-to-back ordering of the bonds that cross; due to the nature of a Möbius band, one such pair of crossing bonds is guaranteed. It is acceptable to further emphasize the non-planarity with a solid wedged bond and a hashed wedged bond at the crossing location, although the placement of the solid wedged bond and the hashed wedged bond must be consistent with the front-to-back ordering of the crossing. In no cases should solid wedged or hashed wedged bonds be present in any other locations within the band.
Molecular propellers consist of three or more rigid planar or mostly planar systems connected to a central atom. In terms of depiction, they should be considered as extended analogs of hindered biaryls. The same recommendations made for biaryls would apply to propellers. Propellers should always be drawn with solid wedged and hashed wedged bonds within the rings and directly connected to the bonds about which they rotate. When one such bond in a ring is drawn as a solid wedged bond, it is preferable for the opposite bond also to be drawn as a solid wedged bond; any bonds between them should be drawn as bold unwedged bonds. The configuration of the propeller system should not solely be represented by solid wedged and hashed wedged bonds to other ring substituents that are distant from the rotatable bond.
ST-6. ENANTIOMERS: MIXTURES AND UNKNOWN ABSOLUTE CONFIGURATIONS
Many compounds — and in particular, those of biological interest — contain more than one stereogenic center. It can be very useful to be able to talk about the relative configuration of various stereogenic centers even in cases where the absolute configuration is not known. Consider the case of tartaric acid:
A known, specific, single configuration could be depicted using diagram A, B, or C. Diagram D should be used when nothing is known about the configuration of the two stereogenic centers; a sample represented by D might, on further analysis, prove in fact to be A, B, or C, but it might also prove to be any combination or mixture of the three.
Those diagrams can depict many common situations, but not all. For example, it is common to have a sample containing a racemate of the (2R,3R)-form A and its (2S,3S)-enantiomer B, but definitely not containing any of the meso (2R,3S)-diastereoisomer C. In that case, the relative configuration of the two stereocenters is known (both “same” according to CIP rules, or both “different” according to the specific use of hashes and wedges above), but the racemic quality cannot easily be depicted without additional descriptive text.
That racemic mixture might be further characterized, and the two enantiomeric forms crystallized separately. At that point, each separate enantiomer has a known relative configuration, but it still might not be known which crystal actually contains the (2R,3R)-form and which contains the (2S,3S)-form. There is no easy way to depict this situation either. In textual nomenclature, this difficulty would be addressed using “star” notation: (2R*,3R*)-tartaric acid.
Tartaric acid is a very simple example, with only two stereogenic centers. The same problems are only multiplied in molecules that contain more than two stereogenic centers. As a still-simple example, a compound with four chirality centers might be known to have a specific relative configuration between the first two centers, a different relative configuration between the last two centers, but have nothing known about the relation between the first two and the last two.
The need to represent unknown absolute configuration encompasses chemicals with a single stereogenic center as well as those with multiple stereogenic centers. As one example, unknown absolute configuration is commonly encountered in chemical syntheses that introduce stereogenic centers to a molecule. Reduction of an unsymmetrically substituted carbonyl group such as butan-2-one will produce a sample that is (probably) racemic. The components of that racemate can be separated, for example, by enantioselective chromatography, into two fractions of known relative configuration (one being an enantiomer of the other), but unknown absolute configuration. One of those samples may be further analyzed, possibly via X-ray crystallography, to determine its absolute configuration, and by implication the absolute configuration of the other sample would also be known at that point as well. In such a sequence, the carbonyl moiety may itself be part of a larger chemical that has other stereocenters, and each of those other stereocenters may be identified in unknown, racemic, relative, or absolute terms. This procedure can quickly become very complex.
The goals of chemical structure representation here are the same as elsewhere: it is important to indicate clearly what molecular entities are intended to be shown by the authors. In the case of relative configuration, it is critical not to conflate unknown, unspecified, and racemic in any way. For a given center, there are at least the following values:
ST-6.2 Absence of indicators indicates configuration as drawn
In the absence of any other sort of indicators, a structural diagram is expected to represent the specific molecular entity drawn. If stereochemical hashed wedged and/or solid wedged bonds are present at all stereogenic centers in the diagram, it will represent a single stereoisomer. If no stereochemical information is present in the diagram, it represents a molecular entity with unknown configuration.
This recommendation is at odds with the historic (last 20–25 years) behavior of the MDL family of software (ChemBase, MACCS, ISIS/Draw, ISIS/Base, etc.). In MDL software, diagrams were assumed to represent a racemate of the absolute configuration drawn and its enantiomer unless an additional “chiral flag” was added explicitly. The present recommendations, however, correspond to prevailing usage within printed chemical communications such as journal articles, books, patents, and so on. More recent software from MDL has also moved in the same direction.
ST-6.3 Mixtures should be represented with additional explanatory text
Other types of relative configuration should be represented with a more verbose description than a single structural diagram. In some situations, it might be acceptable to list separate depictions for all stereoisomers present with some additional text (such as the word “and”) present, to indicate that the two stereoisomers were both intended. When two depictions are shown, they should be shown either in the same orientation or as left-right reflections. It is also permissible to depict a single configuration along with a longer piece of descriptive text, such as “and enantiomer”.
ST-6.4 Racemic mixtures and other mixtures in known proportions
If a mixture of stereoisomers is present in a known ratio, the relative ratios of each enantiomer may be specified by appropriate additional explanatory text. Such explanatory text may only be used when both enantiomers are drawn explicitly, and must always read from left to right in the same left-to-right order in which the diagrams are presented.
The use of the terms “racemate” [1] and “rac” should be avoided as structural labels. Although such terms continue to be preferred in textual nomenclature, graphical depictions benefit from the clearer (if longer) explanatory text discussed in ST-6.3.
1. IUPAC Commission on Nomenclature of Organic Chemistry. Pure Appl. Chem. 68, 2193 (1996).
2. (a) IUPAC-IUB Joint Commission on Biochemical Nomenclature. Eur. J. Biochem. 186, 429 (1989); (b) IUPAC-IUB Joint Commission on Biochemical Nomenclature. Eur. J. Biochem. 213, 2 (1993); (c) IUPAC-IUB Joint Commission on Biochemical Nomenclature. Pure Appl. Chem. 61, 1783 (1989); (d) R. A. Hill, D. N. Kirk, H. L. J. Makin, G. M. Murphy (Eds.), Dictionary of Steroids, pp. xxx–lix, Chapman & Hall, London (1991).
3. S.-K. Lin, L. Patiny, A. Yerin, J. L. Wisniewski, B. Testa. Enantiomer 5, 571 (2000).
4. See, for example, Figs. 10a and 11b in H. Maehr. J. Chem. Inf. Comput. Sci. 42, 894 (2002).
5. (a) IUPAC-IUBMB Joint Commission on Biochemical Nomenclature. Adv. Carbohydr. Chem. Biochem. 52, 43 (1997); (b) IUPAC-IUBMB Joint Commission on Biochemical Nomenclature. Carbohydr. Res. 297, 1 (1997); (c) IUPAC-IUBMB Joint Commission on Biochemical Nomenclature. J. Carbohydr. Chem. 16, 1191 (1997); (d) IUPAC-IUBMB Joint Commission on Biochemical Nomenclature. Pure Appl. Chem. 68, 1919 (1996).
6. (a) R. S. Cahn, C. K. Ingold, V. Prelog. Angew. Chem. 78, 413 (1966); (b) R. S. Cahn, C. K. Ingold, V. Prelog. Angew. Chem., Int. Ed. Engl. 5, 385 (1966); (c) R. S. Cahn, C. K. Ingold, V. Prelog. Angew. Chem., Int. Ed. Engl. 5, 511 (1966); (d) V. Prelog, G. Helmchen. Angew. Chem. 94, 614 (1982); (e) V. Prelog, G. Helmchen. Angew. Chem., Int. Ed. Engl. 21, 567 (1982).
7. H. Maehr. J. Chem. Inf. Comput. Sci. 42, 894 (2002).
8. H. Maehr. J. Chem. Educ. 62, 114 (1985).
9. MDL Information Systems, Inc. MDL’s Enhanced Stereochemical Representation. http://www.mdl.com/solutions/white_papers/stereochemistry-white-paper.jsp (accessed May, 2006).
10. E. L. Eliel, S. H. Wilen. Stereochemistry of Organic Compounds, pp. 117–124, John Wiley, New York (1994).
11. E. Fischer. Ber. Dtsch. Chem. Ges. 24, 1836 (1891).
12. E. Fischer. Ber. Dtsch. Chem. Ges. 24, 2683 (1891).
13. IUPAC Commission on Macromolecular Nomenclature. Pure Appl. Chem. 53, 733 (1981).
14. IUPAC Commission on Macromolecular Nomenclature. Pure Appl. Chem. 74, 915 (2002).
15. J. A. Mills. Adv. Carbohydr. Chem. Biochem. 10, 1 (1955).
16. IUPAC. Nomenclature of Inorganic Chemistry, IUPAC Recommendations 2005, N. G. Connelly, T. Damhus, R. M. Hartshorn, A. T. Hutton (Eds.), The Royal Society of Chemistry, Cambridge (2005) (The Red Book).
17. J. L. Locher (Ed.), M.C. Escher, His Life and Complete Graphic Work: with a Fully Illustrated Catalog, H. N. Abrams, New York (1982).
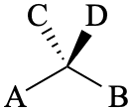
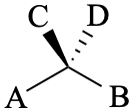
Preferred Preferred
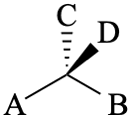
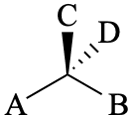
Acceptable Acceptable
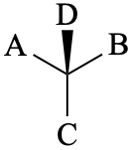
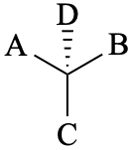
Preferred Preferred
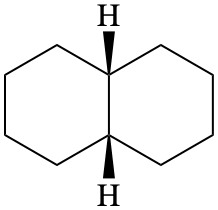
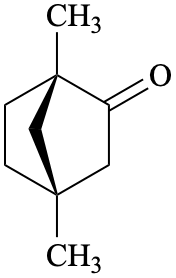
Preferred Preferred
Preferred Acceptable
Preferred Preferred
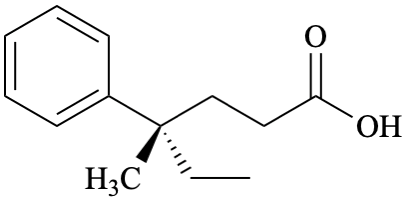
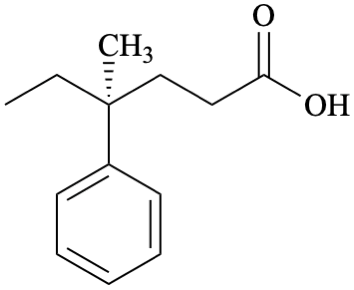
Preferred Preferred
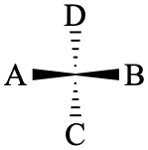
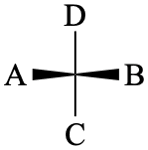
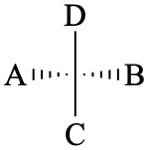
Acceptable Acceptable Acceptable
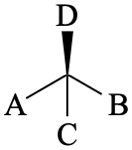
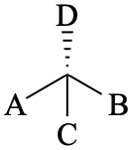
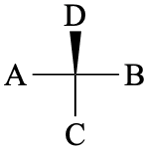

Not acceptable Not acceptable Not acceptable Not acceptable
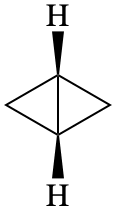
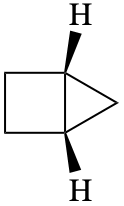
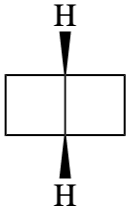
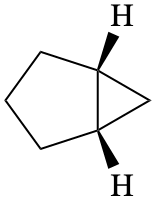
Preferred Preferred Preferred Preferred

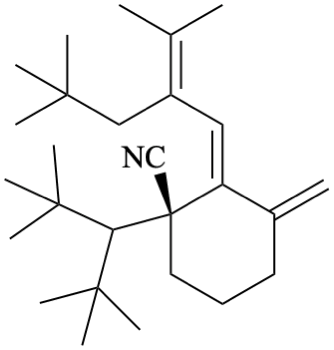
Preferred Acceptable
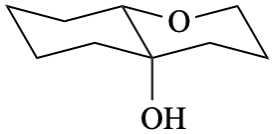
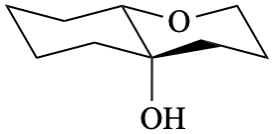
Acceptable Not acceptable 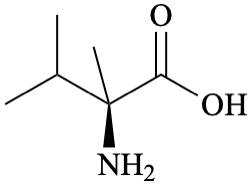
Not acceptable

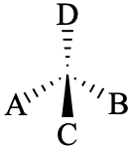
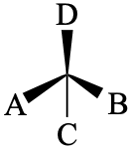
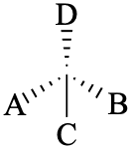
Not acceptable Not acceptable Not acceptable Not acceptable
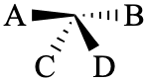
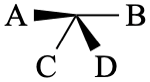
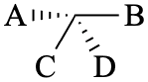
Not acceptable Not acceptable Not acceptable
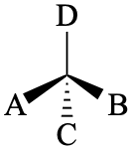
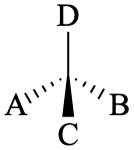
Not acceptable Not acceptable

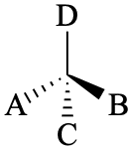
Not acceptable Not acceptable
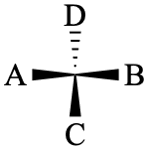
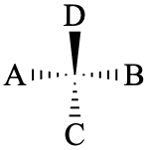
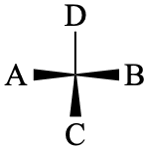
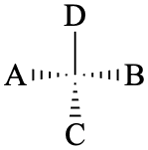
Not acceptable Not acceptable Not acceptable Not acceptable 
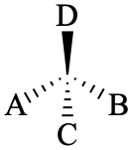

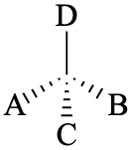
Not acceptable Not acceptable Not acceptable Not acceptable
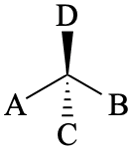
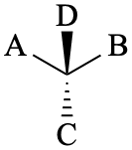
Not acceptable Not acceptable

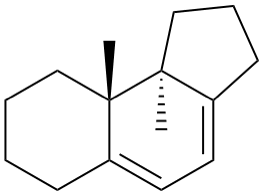
Not acceptable Preferred 
wrong
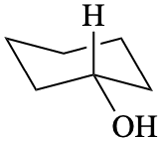
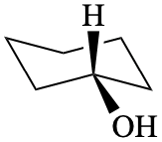
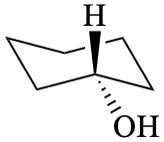
Acceptable Acceptable Not acceptable
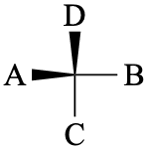
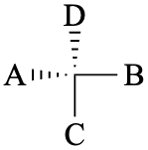

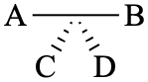
Not acceptable Not acceptable Not acceptable Not acceptable
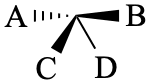
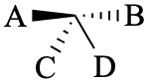
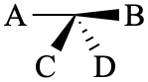

Not acceptable Not acceptable Not acceptable Not acceptable 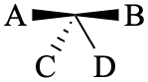
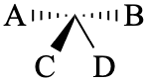
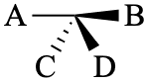
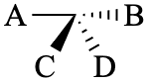
Not acceptable Not acceptable Not acceptable Not acceptable
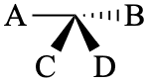
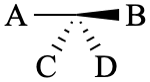
Not acceptable Not acceptable
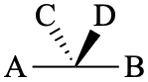
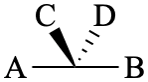
Wrong Wrong
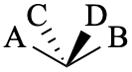
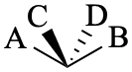
Wrong Wrong 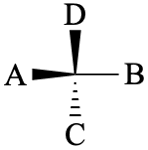
Wrong
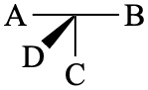
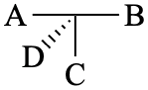
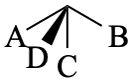
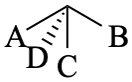
Wrong Wrong Wrong Wrong 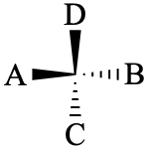
Wrong
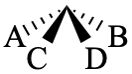
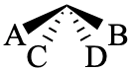
Wrong Wrong
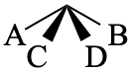
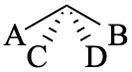
Wrong Wrong
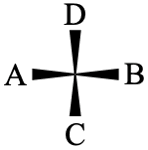
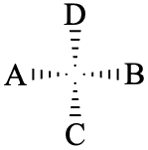
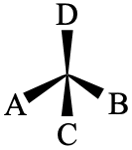
Wrong Wrong Wrong 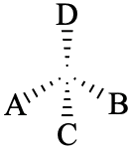
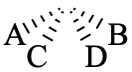
Wrong Wrong Wrong 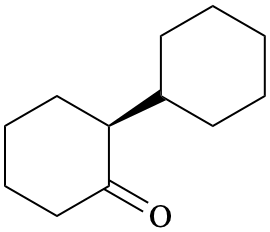
Preferred

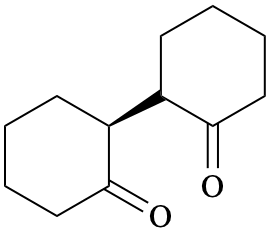
Preferred Not acceptable
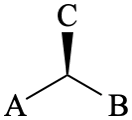

Preferred Preferred
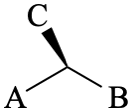
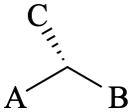
Acceptable Acceptable 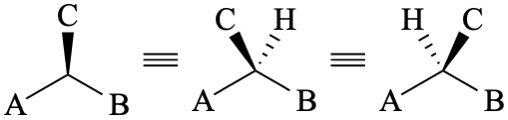
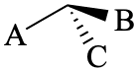
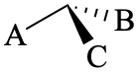
Acceptable Acceptable 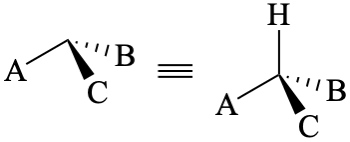
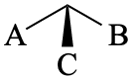

Not acceptable Not acceptable 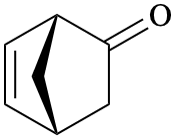
Preferred

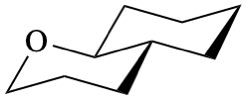
Acceptable Not acceptable 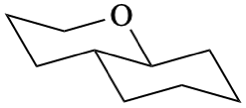
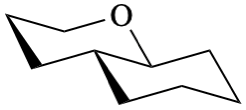
Acceptable Not acceptable 
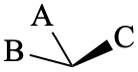
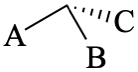
Not acceptable Not acceptable
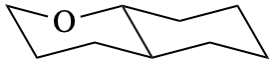
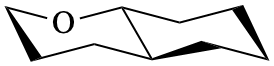
Acceptable Not acceptable 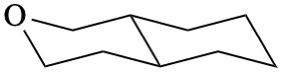
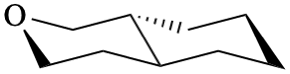
Acceptable Not acceptable 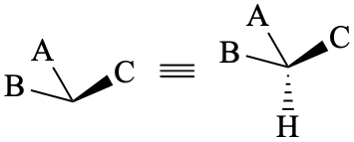
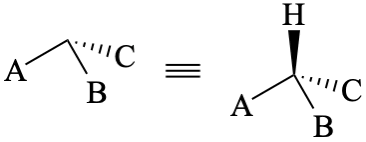

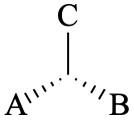
Not acceptable Not acceptable Not acceptable Not acceptable 

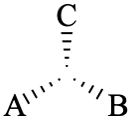
Not acceptable Not acceptable
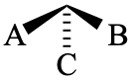
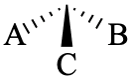
Not acceptable Not acceptable
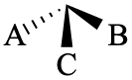
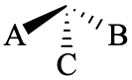
Not acceptable Not acceptable
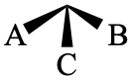
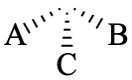
Not acceptable Not acceptable
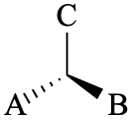
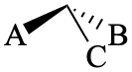
Not acceptable Not acceptable


Not acceptable Not acceptable
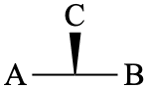
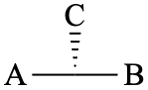
Not acceptable Not acceptable 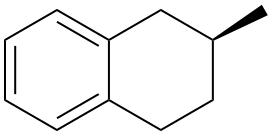
Preferred
Preferred
Preferred
Preferred

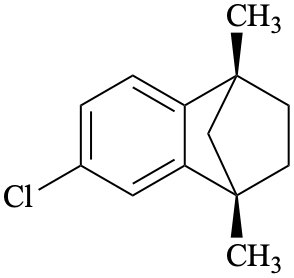

Preferred Acceptable Not acceptable Wrong
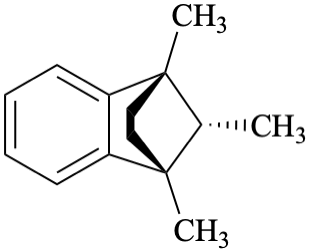
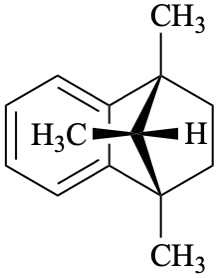
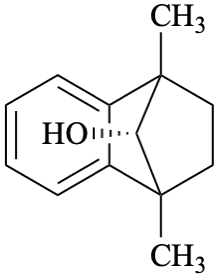
Preferred Acceptable Not acceptable 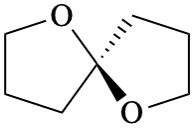
Preferred
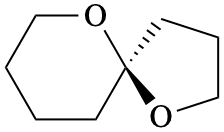
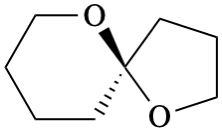
Preferred Acceptable
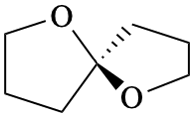
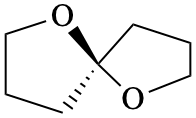
Preferred Not acceptable 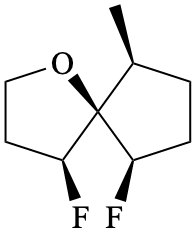
Preferred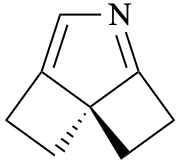
Preferred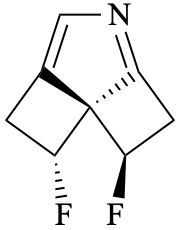
Preferred
Acceptable Acceptable Not acceptable
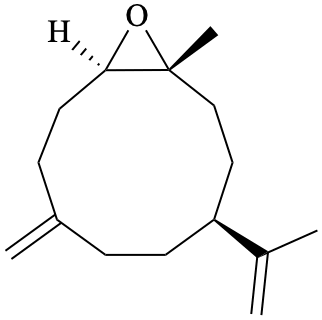
Preferred Preferred Acceptable Not acceptable
Acceptable Acceptable
Acceptable Not acceptable
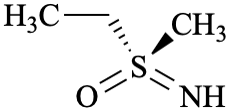
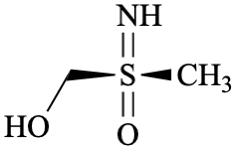
Preferred Preferred Acceptable 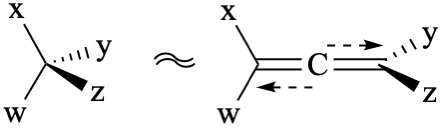
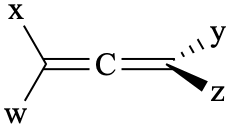
Preferred Not acceptable Not acceptable Not acceptable
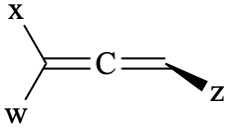
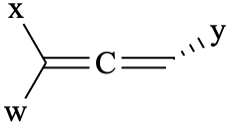
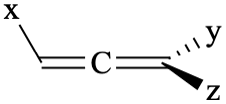
Acceptable Acceptable Acceptable Acceptable 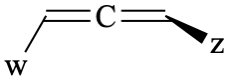
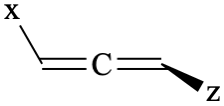
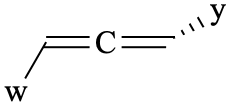
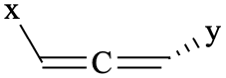
Acceptable Acceptable Acceptable Acceptable
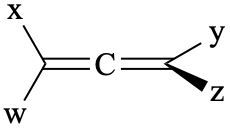
Acceptable Not acceptable 
Preferred

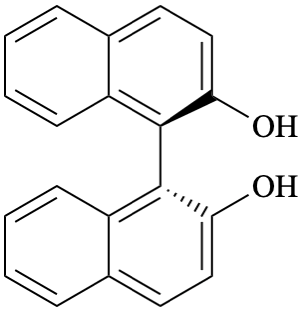
Preferred Acceptable Acceptable 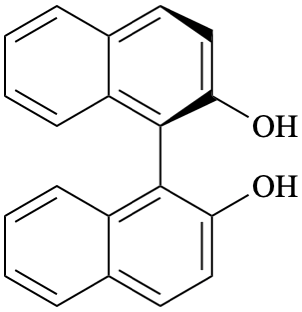
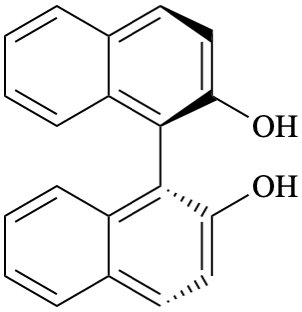
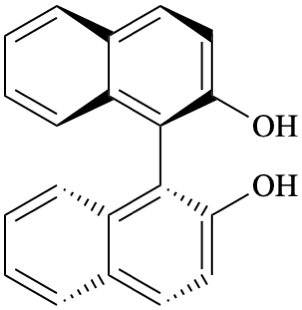
Not acceptable Not acceptable Not acceptable
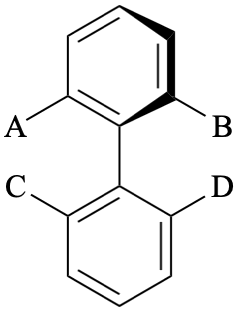
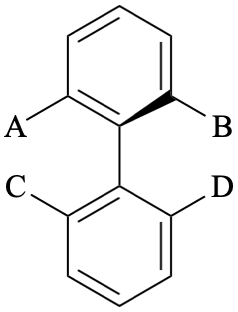
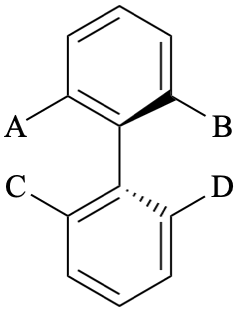
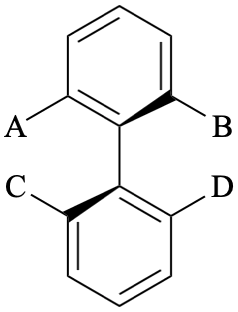
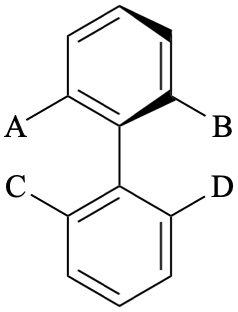
Preferred Acceptable Acceptable Acceptable Not acceptable
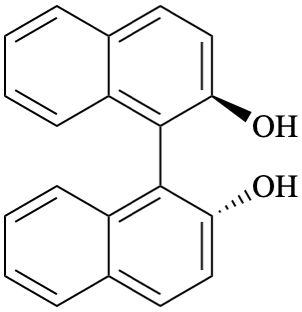
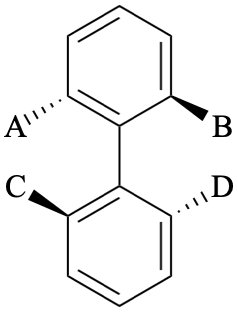
Not acceptable Not acceptable
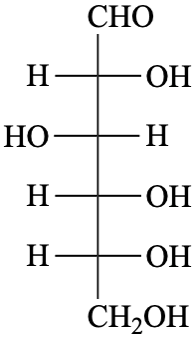
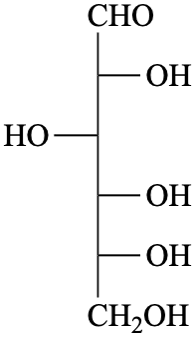
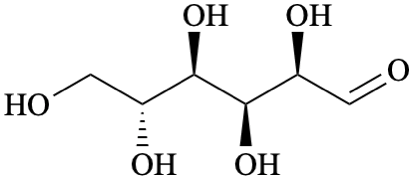
Preferred
(in Fischer projections)Acceptable Preferred
(for general usage)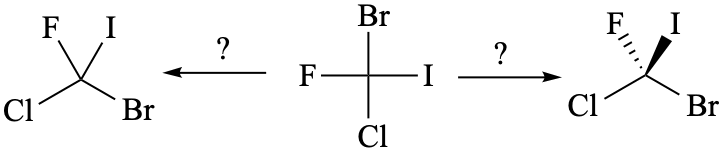
Fischer-like depictions of small non-carbohydrates are ambiguous since it can be unclear if a specific configuration was actually intended
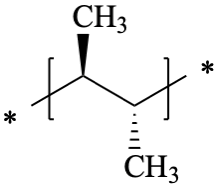
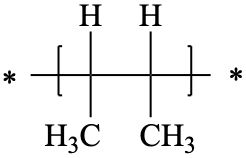
Preferred Acceptable 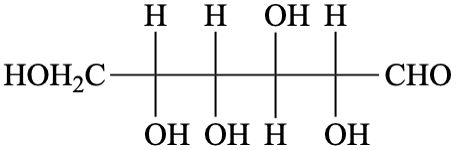
Not acceptable
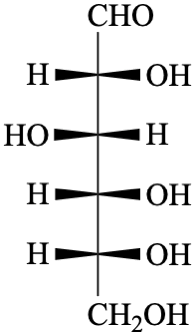
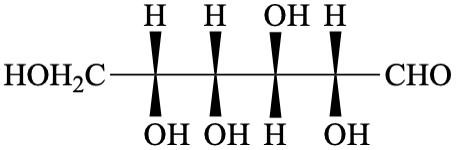
Acceptable Acceptable
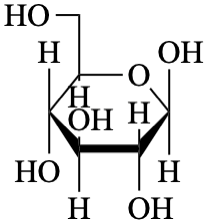
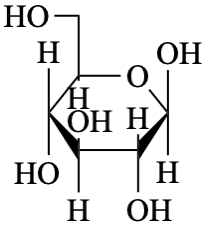
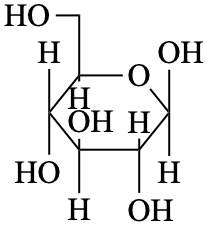
Preferred
(in Haworth diagrams)Not acceptable Acceptable 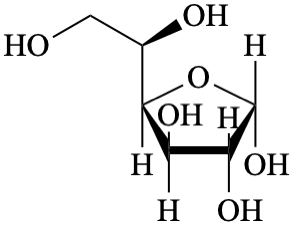
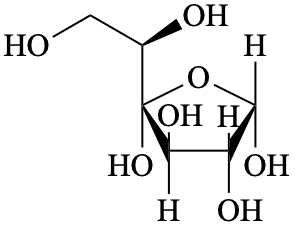
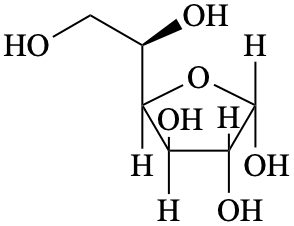
Preferred
(in Haworth diagrams)Not acceptable Acceptable

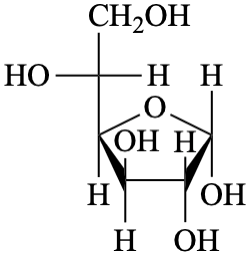
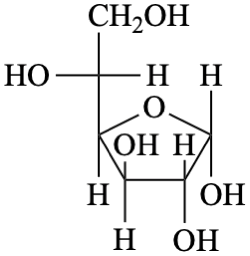
Acceptable Not acceptable Acceptable
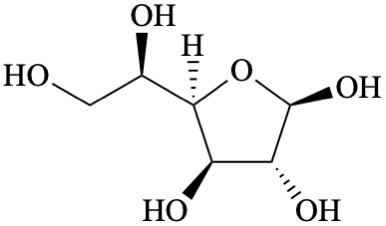
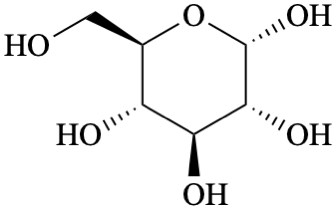
Preferred Preferred
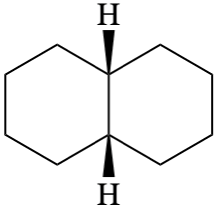
Preferred Not acceptable
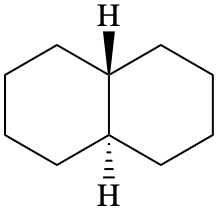
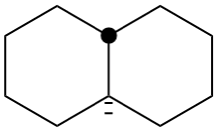
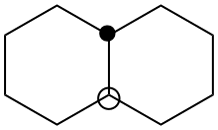
Preferred Not acceptable Not acceptable
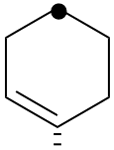
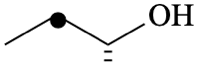
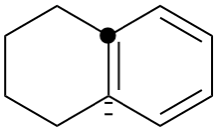
Wrong Wrong Wrong

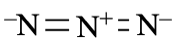
Preferred Preferred Preferred Preferred
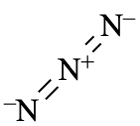
![]()
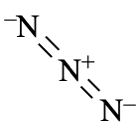
Not acceptable Not acceptable Not acceptable
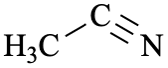
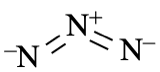
Not acceptable Not acceptable
HCCH HCN CO2 N3– NNN– Preferred Preferred Preferred Preferred Preferred
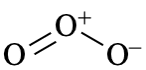
Preferred Preferred Preferred Preferred
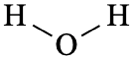
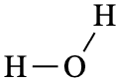
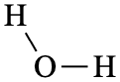
![]()
![]()
Acceptable Acceptable Acceptable Acceptable Acceptable
H2O H2S NO2 O3 Preferred Preferred Preferred Preferred
![]()
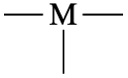
![]()
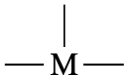
Preferred Preferred Preferred Preferred
![]()
![]()
![]()
![]()
Not acceptable Not acceptable Not acceptable Not acceptable ![]()
Preferred
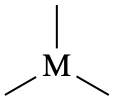
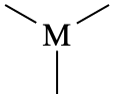
![]()
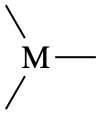
Preferred Preferred Preferred Preferred
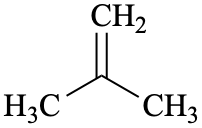

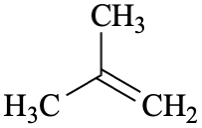
Preferred Preferred Preferred
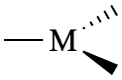
![]()
![]()
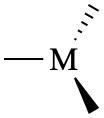
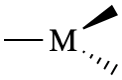
Preferred Preferred Preferred Preferred Preferred 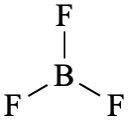
Preferred
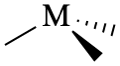
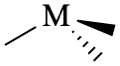
Preferred Not acceptable

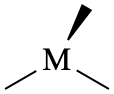
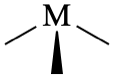
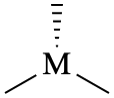
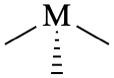
Preferred Acceptable Preferred Acceptable Acceptable
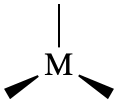
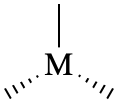
Not acceptable Not acceptable 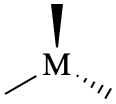
Preferred
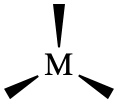
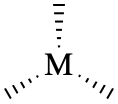
Not acceptable Not acceptable
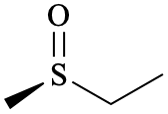
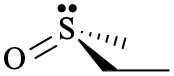
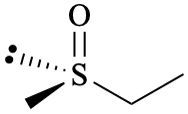
Preferred Acceptable Not acceptable 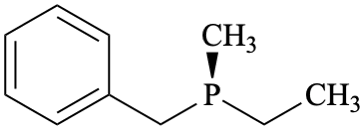
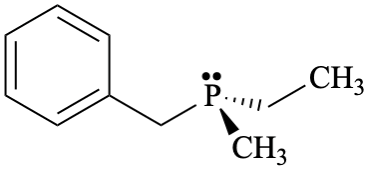
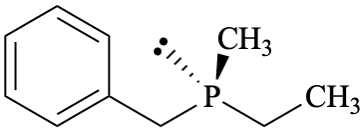
Preferred Acceptable Not acceptable
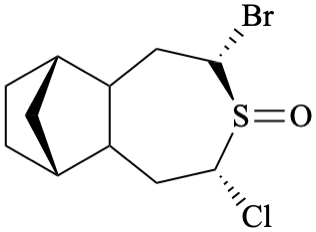
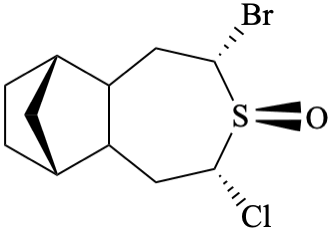
Preferred Acceptable
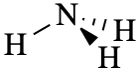
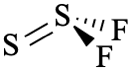
Preferred Preferred
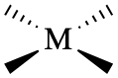
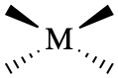
Preferred Not acceptable
![]()
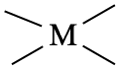
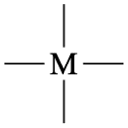
Acceptable Acceptable Acceptable
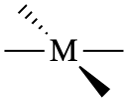
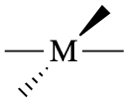
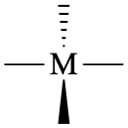
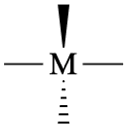
Not acceptable Not acceptable Not acceptable Not acceptable
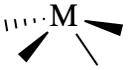
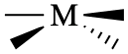
Not acceptable Not acceptable
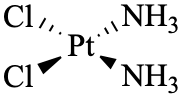
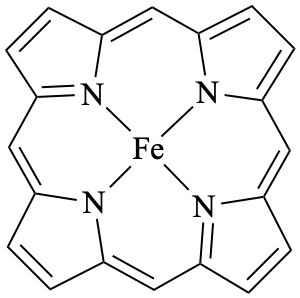
Preferred Preferred
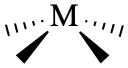
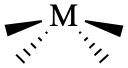
Preferred Not acceptable 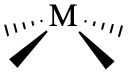
Preferred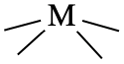
Acceptable

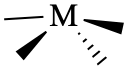
Not acceptable Not acceptable 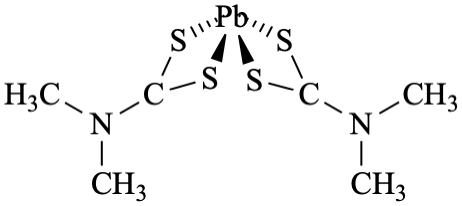
Preferred
![]()
![]()
![]()
![]()
Preferred Preferred Not acceptable Not acceptable
![]()
![]()
Acceptable Acceptable
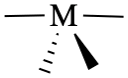
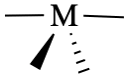

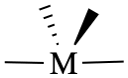
Preferred Preferred Preferred Preferred
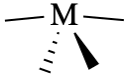
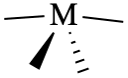
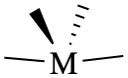
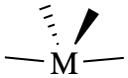
Acceptable Acceptable Acceptable Acceptable
![]()
![]()
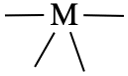
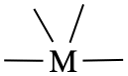
Preferred Preferred Preferred Preferred ![]()
![]()
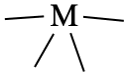
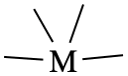
Not acceptable Not acceptable Not acceptable Not acceptable
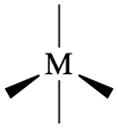
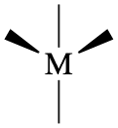
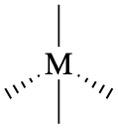
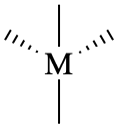
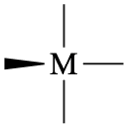
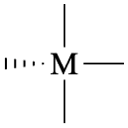
Not acceptable Not acceptable Not acceptable Not acceptable Not acceptable Not acceptable
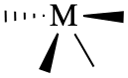
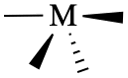
Not acceptable Not acceptable
![]()
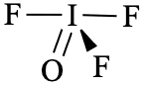
![]()
Preferred Preferred Preferred
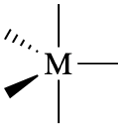
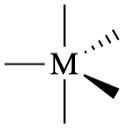
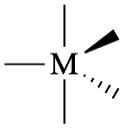
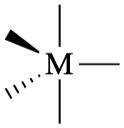
Preferred Preferred Not acceptable Not acceptable
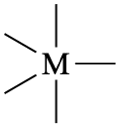
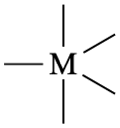
Acceptable Acceptable
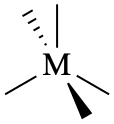
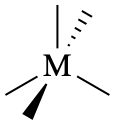
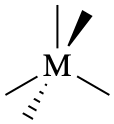

Acceptable Acceptable Not acceptable Not acceptable

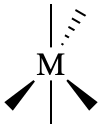
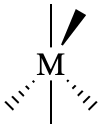
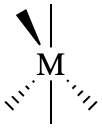
Acceptable Acceptable Not acceptable Not acceptable
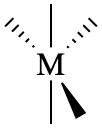
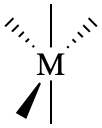
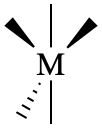
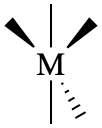
Not acceptable Not acceptable Not acceptable Not acceptable
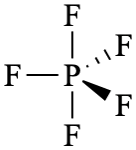
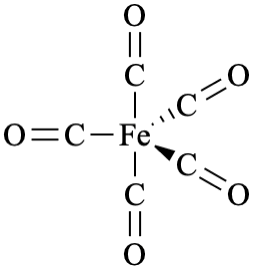
Preferred Preferred
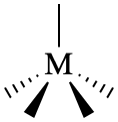
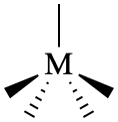
Preferred Not acceptable
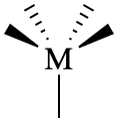
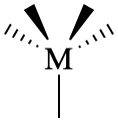
Preferred Not acceptable
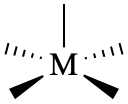
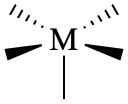
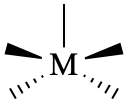
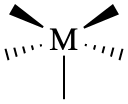
Preferred Preferred Not acceptable Not acceptable
![]()
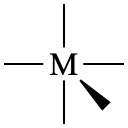
![]()
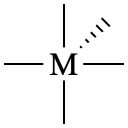
Preferred Acceptable Not acceptable Not acceptable
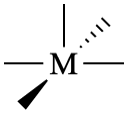

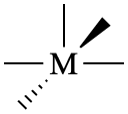
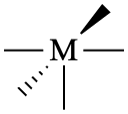
Acceptable Acceptable Not acceptable Not acceptable
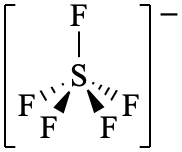
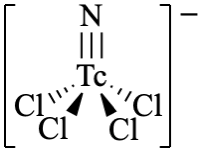
Preferred Preferred
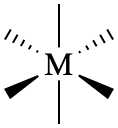
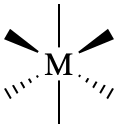
Preferred Not acceptable 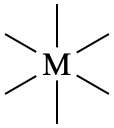
Acceptable
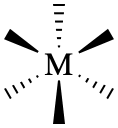
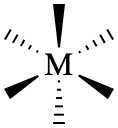
Acceptable Acceptable
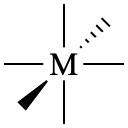
![]()
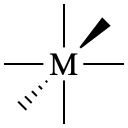
![]()
Acceptable Acceptable Not acceptable Not acceptable

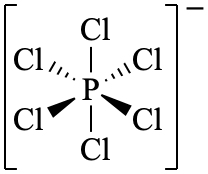
Preferred Preferred
![]()
![]()
![]()
![]()
Preferred Acceptable Preferred Acceptable
![]()
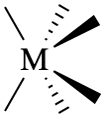
![]()
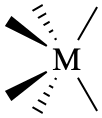
Preferred Acceptable Preferred Acceptable
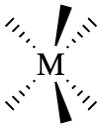
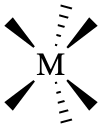
Not acceptable Not acceptable
![]()
![]()
Not acceptable Not acceptable
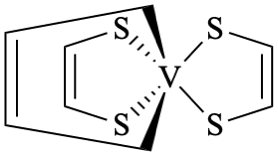
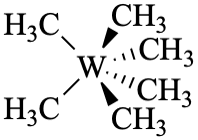
Preferred Preferred 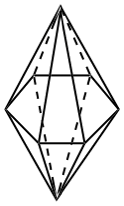
Preferred
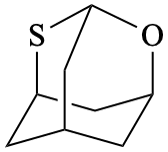
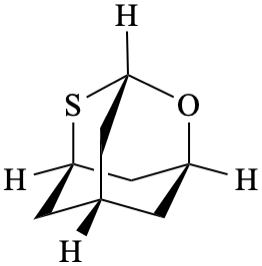
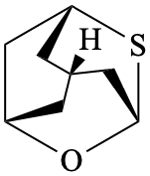
Preferred Acceptable Acceptable
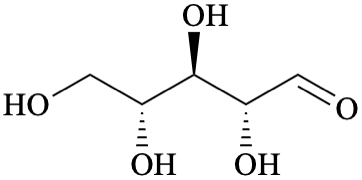
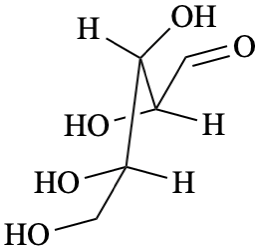
Preferred Not acceptable
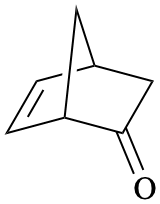
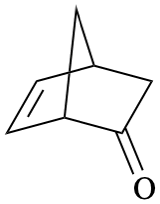
Preferred Not acceptable 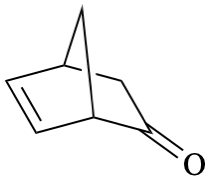
Acceptable
Not acceptable
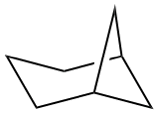
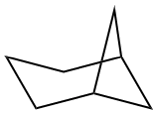
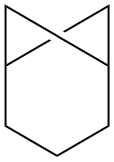
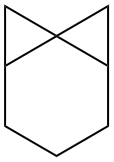
Acceptable Not acceptable Acceptable Preferred Acceptable 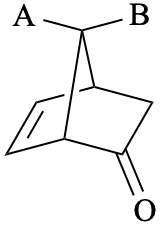
Preferred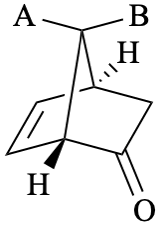
Acceptable
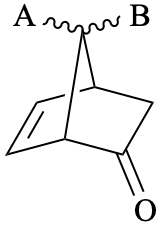
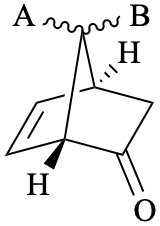
Preferred Acceptable

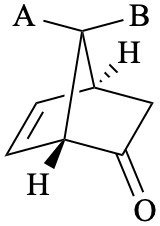
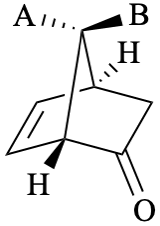
Preferred Acceptable Acceptable
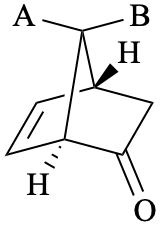
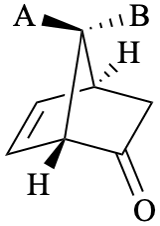
Wrong Wrong 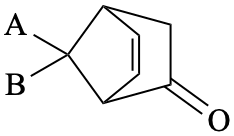
Preferred
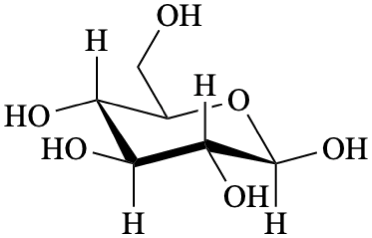
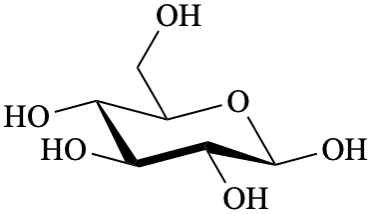
Acceptable Acceptable 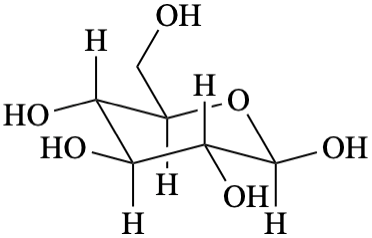
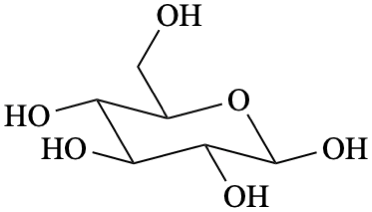
Acceptable Acceptable
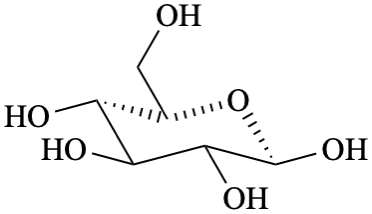

Not acceptable Not acceptable 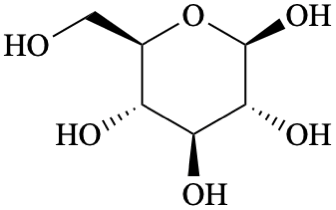
Preferred
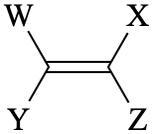
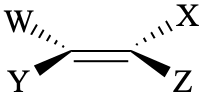
Preferred Acceptable
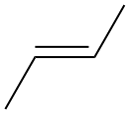
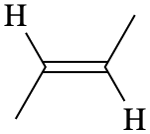
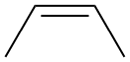
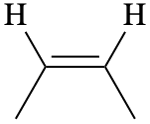
Preferred Preferred Preferred Preferred 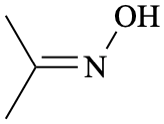
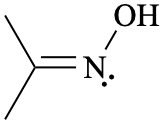
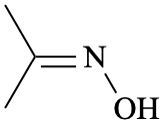
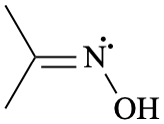
Preferred Acceptable Preferred Acceptable 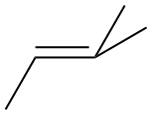
Not acceptable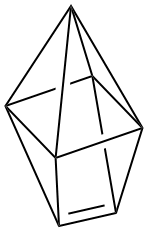
Preferred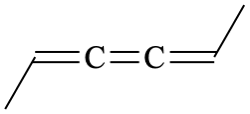
Preferred
Preferred Not acceptable
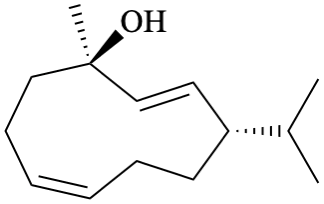
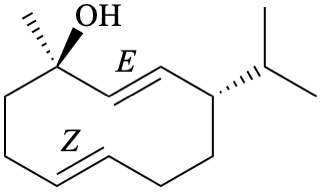
Preferred Not acceptable


Preferred Preferred Not acceptable Not acceptable

Acceptable Not acceptable Not acceptable
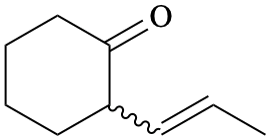
Preferred Not acceptable


Preferred Not acceptable
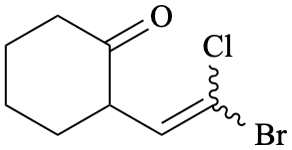
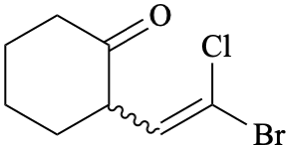
Preferred Not acceptable

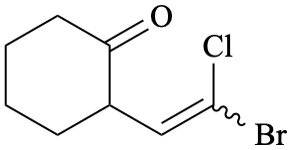
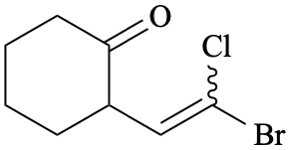
Preferred Acceptable Acceptable 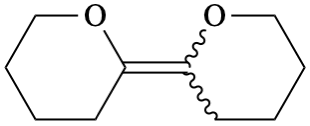
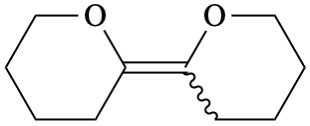
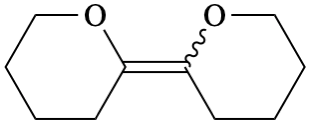
Preferred Acceptable Acceptable
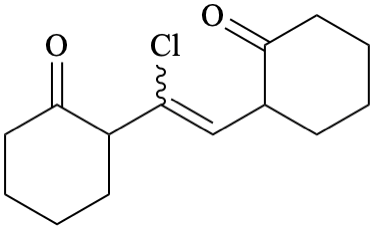
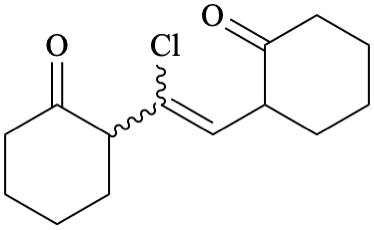
Preferred Not acceptable 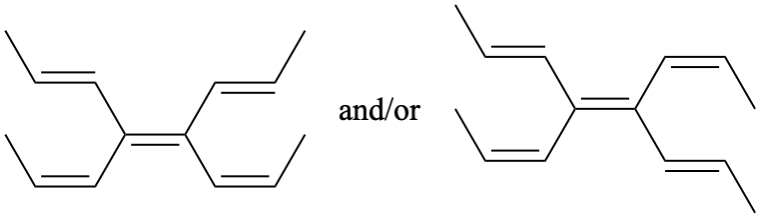
Preferred
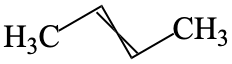
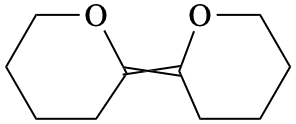
Not acceptable Not acceptable
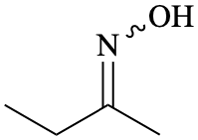

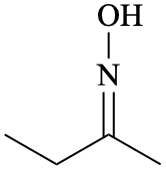


Preferred Acceptable Acceptable Acceptable Acceptable
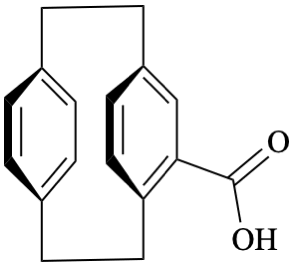
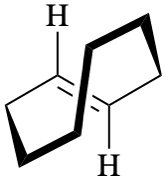
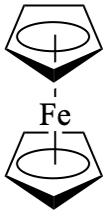
Preferred Preferred Preferred
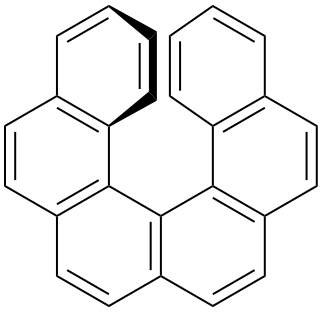
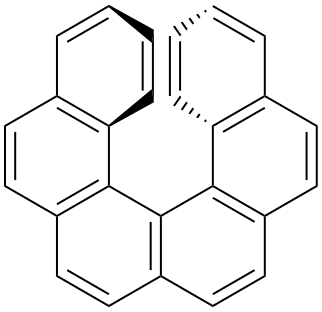
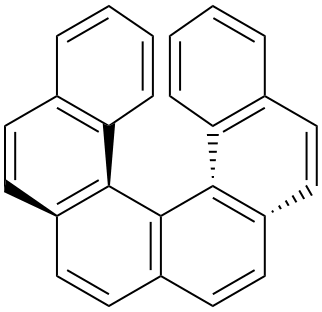
Preferred Not acceptable Not acceptable Not acceptable
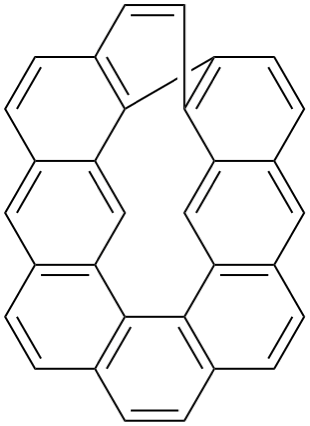
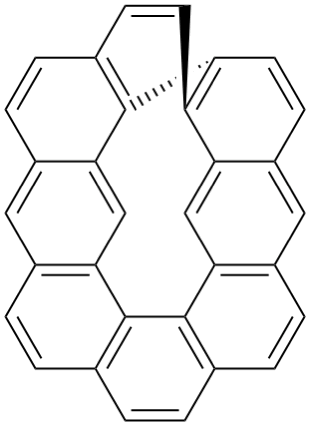
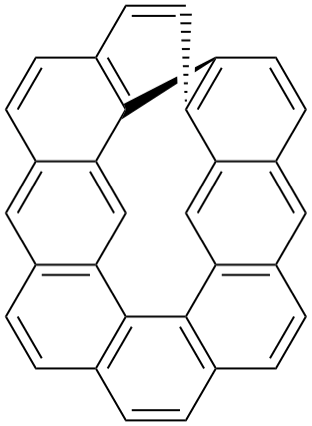
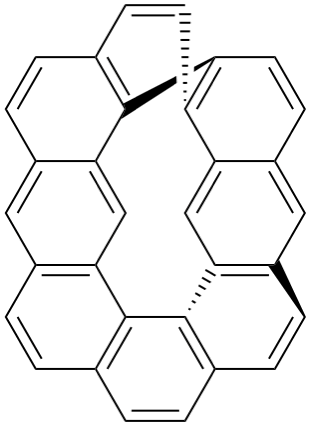
Preferred Acceptable Not acceptable Not acceptable
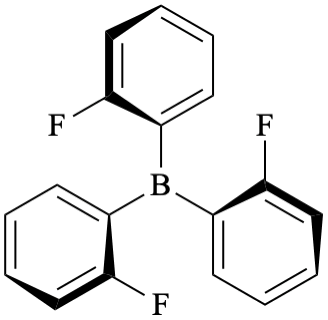
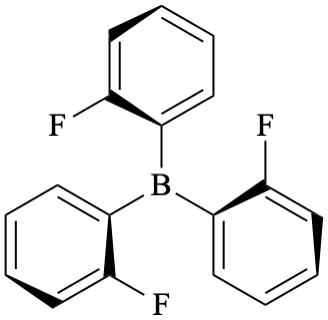
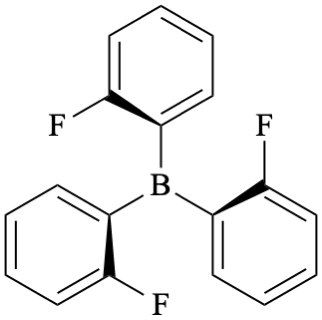
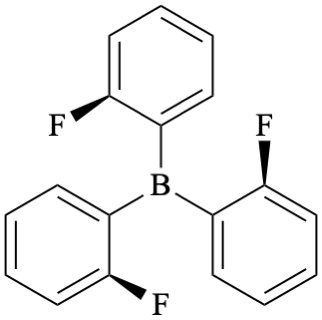
Preferred Not acceptable Acceptable Not acceptable
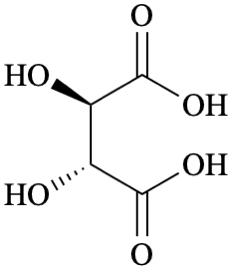
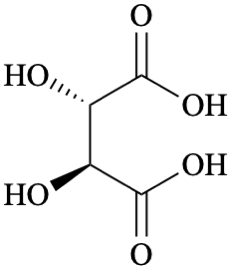
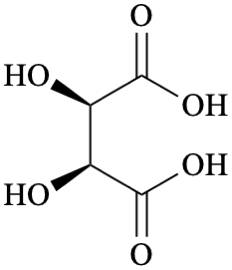
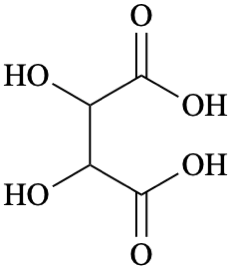
(2R,3R)-tartaric acid
A(2S,3S)-tartaric acid
B(2R,3S)-tartaric acid
Ctartaric acid
D
• Known absolute
Unfortunately, it is extremely difficult to represent all of these different possibilities in a legible manner simply by using variations of bond types [7,8] or atom-based indicators [9] (see ST-0.8)
• Unknown absolute (i.e., a single stereoisomer)
• Racemic (known to be a 50:50 mixture of enantiomers, at least at some stage in the experiment)
• Enantiomerically enriched (enantioenriched, or scalemic) (known to be a mixture of enantiomers, but not in a 50:50 ratio)
• Unknown (no information known experimentally)
• Unspecified (no knowledge whatever)
• Known relative (there is a known relationship to some/all of the other centers, but the absolute configuration of the centers is unknown)
• Unknown relative [it is known that the configuration depends on another center, but it is not known what the relationship is. For example, a new reagent is known to provide stereospecificity, but the nature of that (cis or trans, for example) has not yet been determined]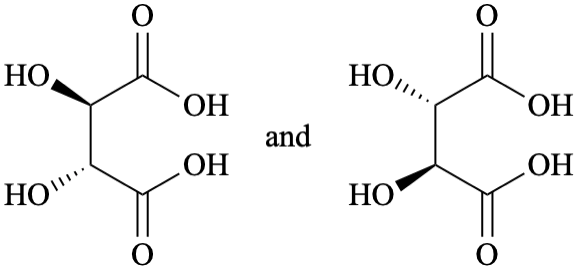
Preferred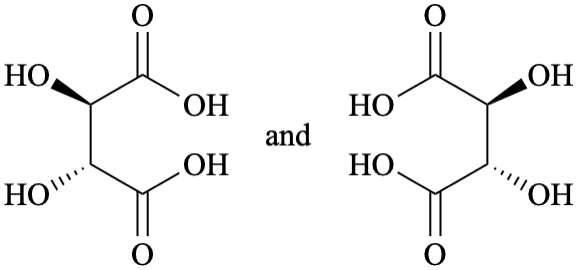
Preferred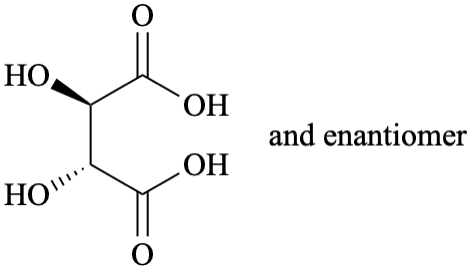
Preferred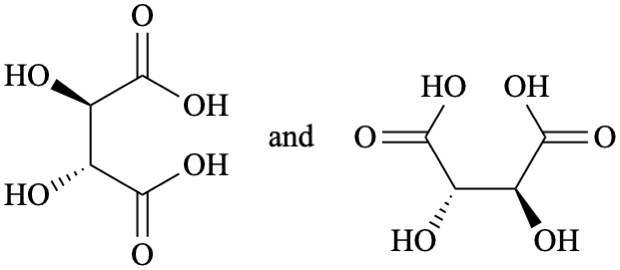
Not acceptable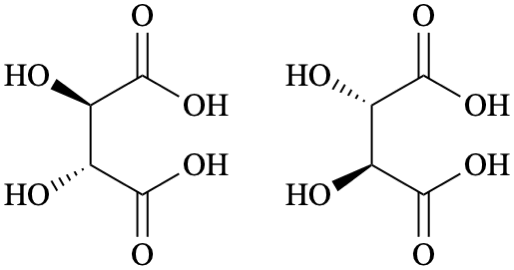
Not acceptable
Not acceptable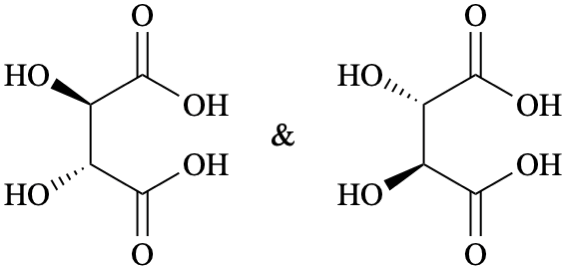
Not acceptable
Not acceptable
Preferred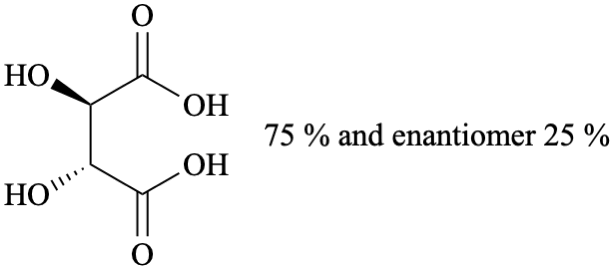
Not acceptable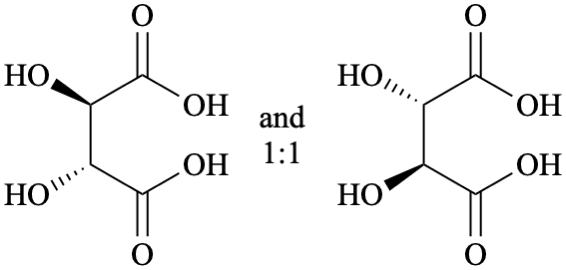
Preferred (when ratio is known to be 50:50)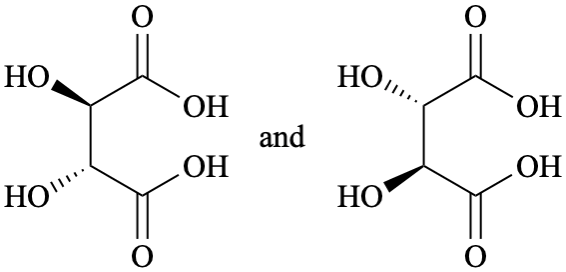
Preferred (when ratio is not known)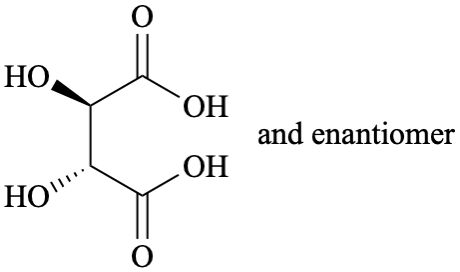
Preferred (when ratio is not known)
Not acceptable
Preferred
Not acceptable
Not acceptable
Preferred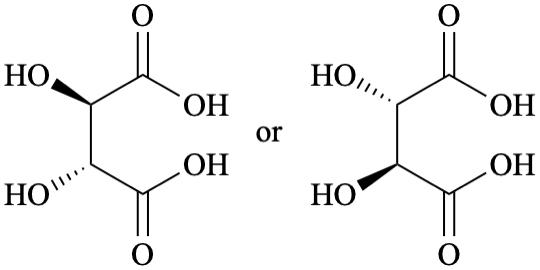
Acceptable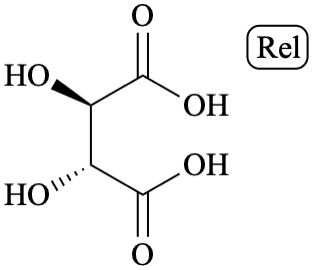
Not acceptable
Return to bibliographic home page
Return to chemical nomenclature home page